Here we provide various quality issues encountered during printing. If you encounter the same or similar problems during printing, you can come here to find solutions.
¶ Common Printing Issues
| Issue | Analysis & Solutions |
|---|---|
 |
Clog/No Extrusion |
 |
Overhang Issues |
 |
Bridging Issues |
 |
Model Warping, Falling Off, or Collapsin |
 |
Filament Sticking to the Nozzle |
 |
Under-Extrusion |
 |
Stringing or Oozing |
 |
Color/Gloss Differences Across Areas |
 |
Seam |
 |
Layer Separation and Splitting |
 |
Visible Layer Lines |
 |
Belt Patterns |
 |
Gaps/Overflow in Top Layers |
¶ Print Quality Issues & Troubleshooting
¶ Clog/No Extrusion
Issue
Cause Analysis
Nozzle/Heat Break Clog
Often caused by temperature mismatch or impurities inside the nozzle or heat break, blocking filament flow.
Extruder Clog
Usually caused by deformed filament clogging inside the extruder, preventing filament loading or unloading.
Solutions
For nozzle/heat break clogs:
- Check if the filament printing temperature set in the slicing software matches the actual filament used. If settings are correct but extrusion still fails, inspect the heater plate and replace it if damaged or aged.
- With prolonged use, carbonized residue can form inside the nozzle. Flush with standard filament and clear the nozzle using an unclogging pin tool until extrusion is smooth.
- When switching from high-temperature filaments (e.g., ABS, ASA) to low-temperature, low-hardness filaments (e.g., PLA), set the temperature to the previous high-temperature filament's printing temperature, manually unload the high-temperature filament, load the low-temperature filament, and then manually extrude.
For extruder clogs:
- If the chamber temperature is too high, low-temperature filaments such as PLA and PETG may soften and deform, jamming the extruder gears or feed path:
- Lower the bed temperature appropriately.
- Place the printer in a recommended ambient temperature environment.
- Use filaments with higher heat deflection temperatures when possible.
- Filament too soft:
Flexible filaments such as TPU may deform under drive gear pressure and lead to clogging. Please avoid using such filament for printing. - Extruder gear issues
Check if nozzle feeding/extrusion is normal. Set the temperature to the filament's printing temperature, click to extrude it, and observe. If the extruded filament falls normally, is long, and has a smooth surface, the nozzle and extruder are normal. If the extruded filament is uneven, breaks, or is rough, there may be an internal nozzle clog or extruder issue. Set the nozzle temperature to the recommended temperature and manually feed filament. If extrusion is even and smooth, it indicates that the nozzle is normal; disassemble the extruder to check for worn gears or debris, and then replace or clean it. - Filament diameter too large or too small
Filament may become thicker due to bending or compression, or become thinner due to wear at extruder gears. Please remove the abnormal filament and reload with properly sized filament.
¶ Overhang Issues
Issue
Cause Analysis
When printing overhangs, the extruded filament is not cooled in time and sags under gravity before solidifying.
Solutions
- Add support for overhang areas.
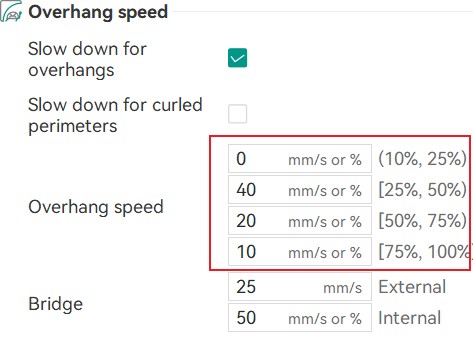
- Enable Slow down for overhangs and reduce the overhang speed to increase cooling time. Fine-tune parameters if necessary.
¶ Bridging Issues
Issue
Cause Analysis
- The bridge distance is too long.
- The extrusion flow is too low and the bridge speed is too high, causing the bridge to be pulled off.
- The extrusion flow is too high and the bridge speed is too low, causing the bridge to sag.
Solutions
- Enable supports for bridge areas.
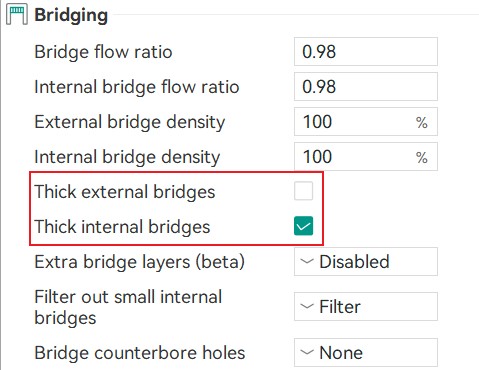
- Appropriately reduce the bridge speed and enable thick bridges.
- Appropriately increase the bridge speed or the bridge flow.
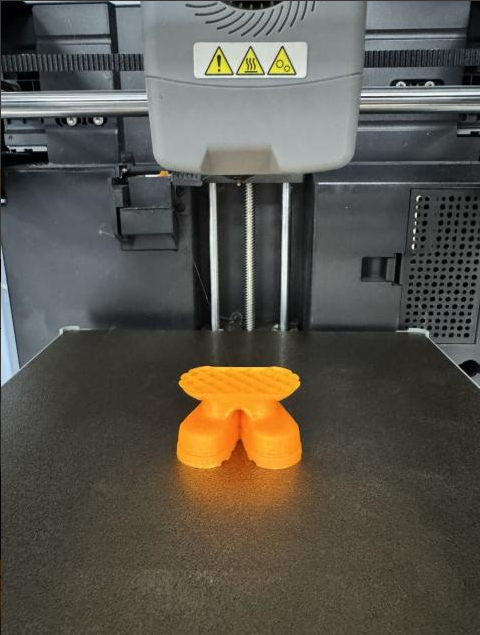
¶ Model Warping, Falling Off, or Collapsing
Issue
Cause Analysis
Insufficient adhesion to the build plate, often caused by a small contact area with the bed or sharp corners, as well as material shrinkage, can lead to warping or detachment. After warping, a noticeable line may appear on the print surface due to the reduced distance between the warped part and the nozzle, causing filament from the current layer to overflow.
Solutions
-
Tall, thin models with small contact areas that may wobble and collapse during printing:
- Reduce the print speed.
- Add supports.
- Reorient the model to increase contact area.
-
Nozzle hitting the model:
- Residual filament stuck to the nozzle can fall onto the model and cool down during printing. It may lead to the nozzle hitting the print. It is recommended to thoroughly clean the nozzle before printing;
- The nozzle temperature may be set lower than required for the filament used. This can result in poorly flowing melt to accumulate at the nozzle tip, which may come into contact with and collide against the model as the extruder moves. It is recommended to increase the nozzle temperature appropriately;
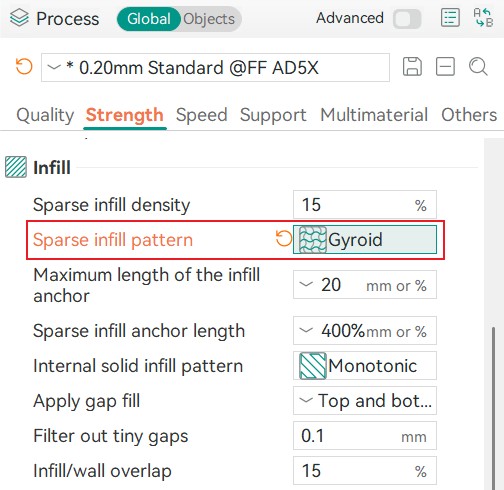
- Some infill patterns (e.g., Grid, Triangles) have crossings within a single layer, so the nozzle will scratch the infill at the crossing point, which usually doesn't affect prints significantly. But if noticeable issues occur, it is recommended to switch to infill patterns without crossing points (e.g., Gyroid, Concentric).
-
Warping occurs when internal stresses from shrinkage of the model exceed the adhesion between the model and the build plate. To address this, solutions focus on two main strategies: increasing adhesion and reducing internal stress.
Enhance the adhesion between the model and the build plate:
- Adjust the bed temperature: For PLA, try increasing from 60°C to 65-70°C. For ABS/ASA, 90-110°C or even higher is usually required.
- Use an enclosed printer: Maintaining a stable chamber temperature is critical for filaments prone to shrinkage.
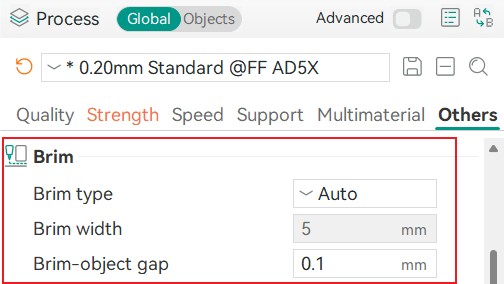
- Enable a brim to increase the contact area.
Optimize and clean the build plate surface: - Cleaning: Thoroughly clean the build plate with isopropyl alcohol or a lint-free cloth dipped in soapy water to remove oils and dust.
- Surface treatment: Apply a thin, even layer of glue on the build plate. This significantly improves adhesion, especially for ABS.
- Leveling before printing: Ensure the first layer adheres perfectly.
Control the cooling speed and temperature to reduce thermal stress: - Reduce the fan speed for initial layers: Turn off fans for the first 3-5 layers to allow the base to stick firmly.
- Lower the overall fan speed: For ABS/ASA/PC, use very low fan speeds (10-30%) or turn off entirely. PLA can handle higher fan speeds, but for large models, reducing it slightly is beneficial.
- Use an enclosure: This helps the model cool slowly and evenly throughout the print.
Optimize the model design and slicing settings to minimize shrinkage stress: - Adjust the infill density and pattern:
- Lower the infill density: High infill (>50%) generates significant shrinkage stress.
- Structural parts: Use 5-6 wall layers with 25-40% infill for strength; this creates less stress than 2 wall layers with 60% infill.
- Non-structural parts: 2-3 wall layers with 15-20% infill is sufficient.
- Change the infill pattern: Replace linear patterns like "Grid" or "Rectilinear" with non-linear patterns such as "Gyroid", "Concentric", or "Lightning" to better distribute stress and reduce outward pulling forces.
- Add adhesion-enhancing features:
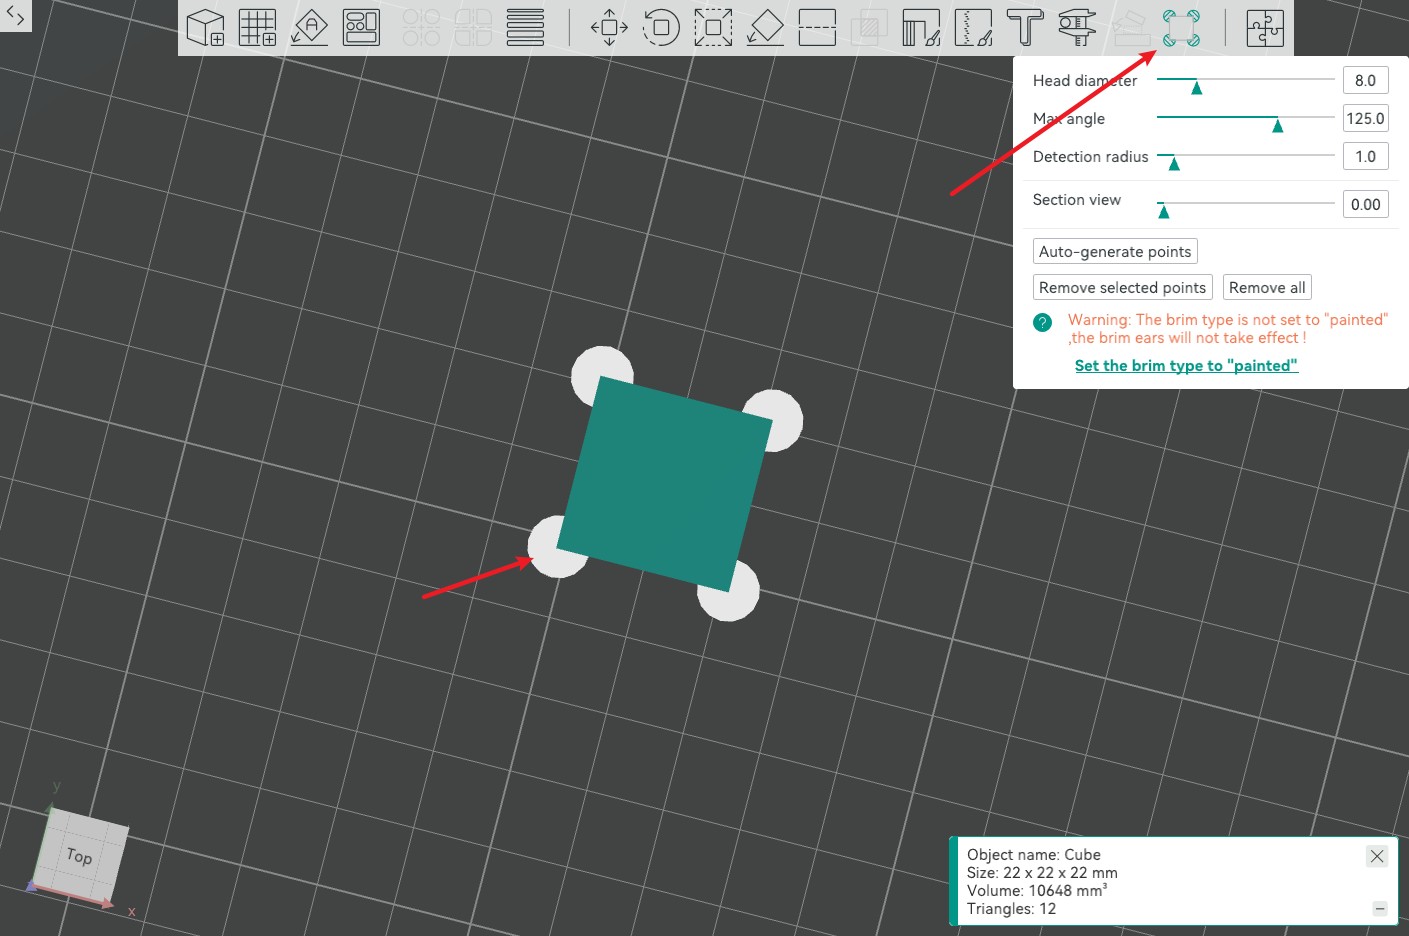
- Brim: Print a single-layer flat area around the base of the model to increase contact area. This is the most common and effective method to prevent warping.
- Brim Ears: Add small circular pads at sharp corners to reinforce the areas most prone to lifting.
Control the print speed and temperature:
- Brim: Print a single-layer flat area around the base of the model to increase contact area. This is the most common and effective method to prevent warping.
- Lower the initial layer speed: Reduce the first layer speed to 30-50% of normal speed to allow better extrusion and adhesion.
- Slightly reduce the print temperature: Excessively high temperatures can increase shrinkage during cooling. Try lowering by 5-10 °C while maintaining good interlayer bonding.
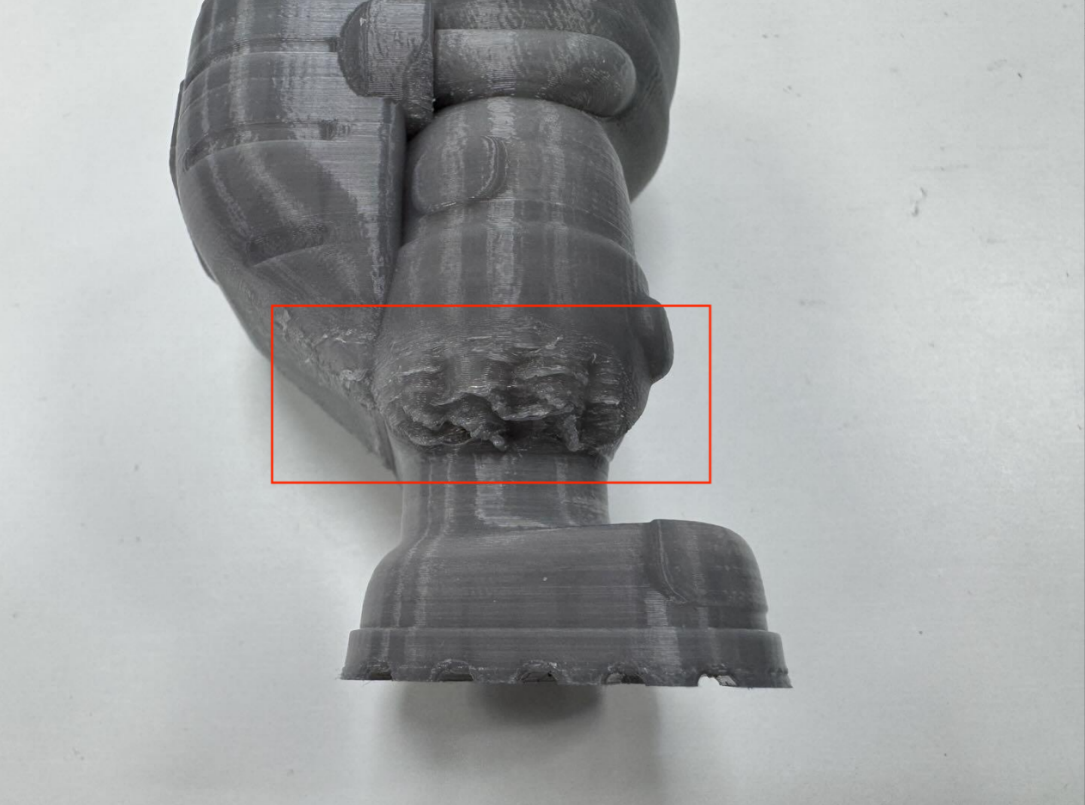
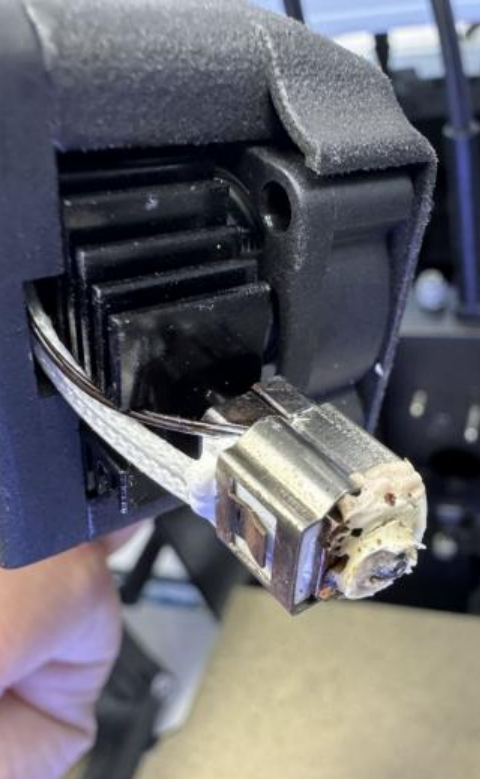
¶ Filament Sticking to the Nozzle
Issue
Cause Analysis
Molten filament cools and solidifies in unintended locations. Causes include:
- Filament and temperature issues
- Print temperature too high: This is the most common cause. When the temperature is too high, the filament becomes overly fluid and can easily ooze from the nozzle or flow onto its sides.
- Filament properties: Some filaments (e.g., PETG, TPU) are inherently sticky and highly elastic, making them more prone to clinging to the nozzle. Filament with high moisture content can also cause problems: when heated, absorbed moisture turns into vapor and expands rapidly in the hotend. This causes the melt at the nozzle to expand, spread, and splatter onto the nozzle surface, where it can carbonize and build up.-
- Poor hotend cooling: A malfunctioning cooling fan or inefficient heatsink can allow heat to creep upward. As a result, filament above the nozzle threads or even in the heatsink area may soften prematurely and leak out.
- Hardware and calibration issues-
- Worn or damaged nozzle: After prolonged use, the nozzle opening may become enlarged, uneven, or develop burrs. This causes the extruded filament to exit at an angle instead of straight down, making it more likely to stick to the nozzle.
- Dirty nozzle: Residue from previous prints may have carbonized on the nozzle. New molten filament readily adheres to this buildup.
- Incorrect Z-offset: If the Z-offset is set too high, the first layer is extruded in mid-air. Instead of bonding to the build plate, the filament is dragged along by the moving nozzle and accumulates on it.
- Improper retraction settings: Insufficient retraction distance or speed fails to pull molten filament back during travel moves, resulting in oozing.
- Slicing and operation issues
- Poor model design or placement can lead to frequent short travel moves. Even with retraction enabled, this increases the chance of oozing due to excessive and ineffective retractions.
Solutions
- Keep the nozzle completely clean
- Clean before every print: With the nozzle heated, carefully wipe the tip to remove any residue.
- Perform regular cold pulls: Heat the nozzle to the printing temperature, manually feed filament, and then cool it down to about 90°C (PLA) or 150°C (PETG). Pull the filament out smoothly and firmly to remove internal carbonized debris.
- Calibrate and inspect
- Calibrate the Z-offset: Enable leveling before printing to ensure proper first-layer adhesion.
- Check the nozzle: If the nozzle shows signs of wear (enlarged or uneven opening), replace it immediately.
- Check the hotend assembly: Ensure the heat break and heatsink are securely installed with no gaps, preventing filament from leaking into non-melting zones.
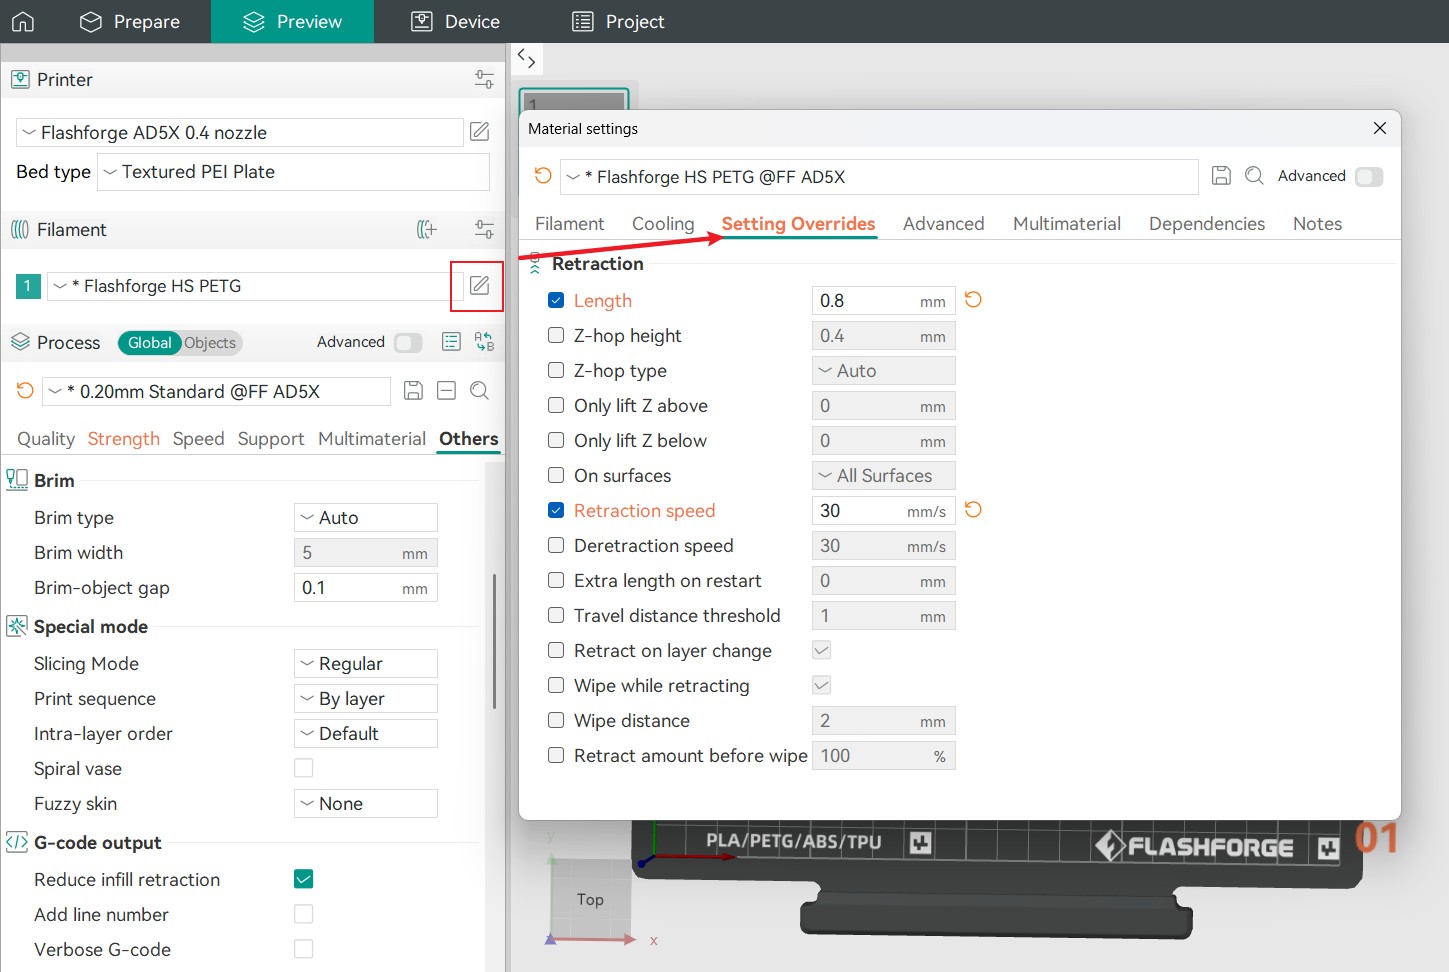
- Optimize slicing settings
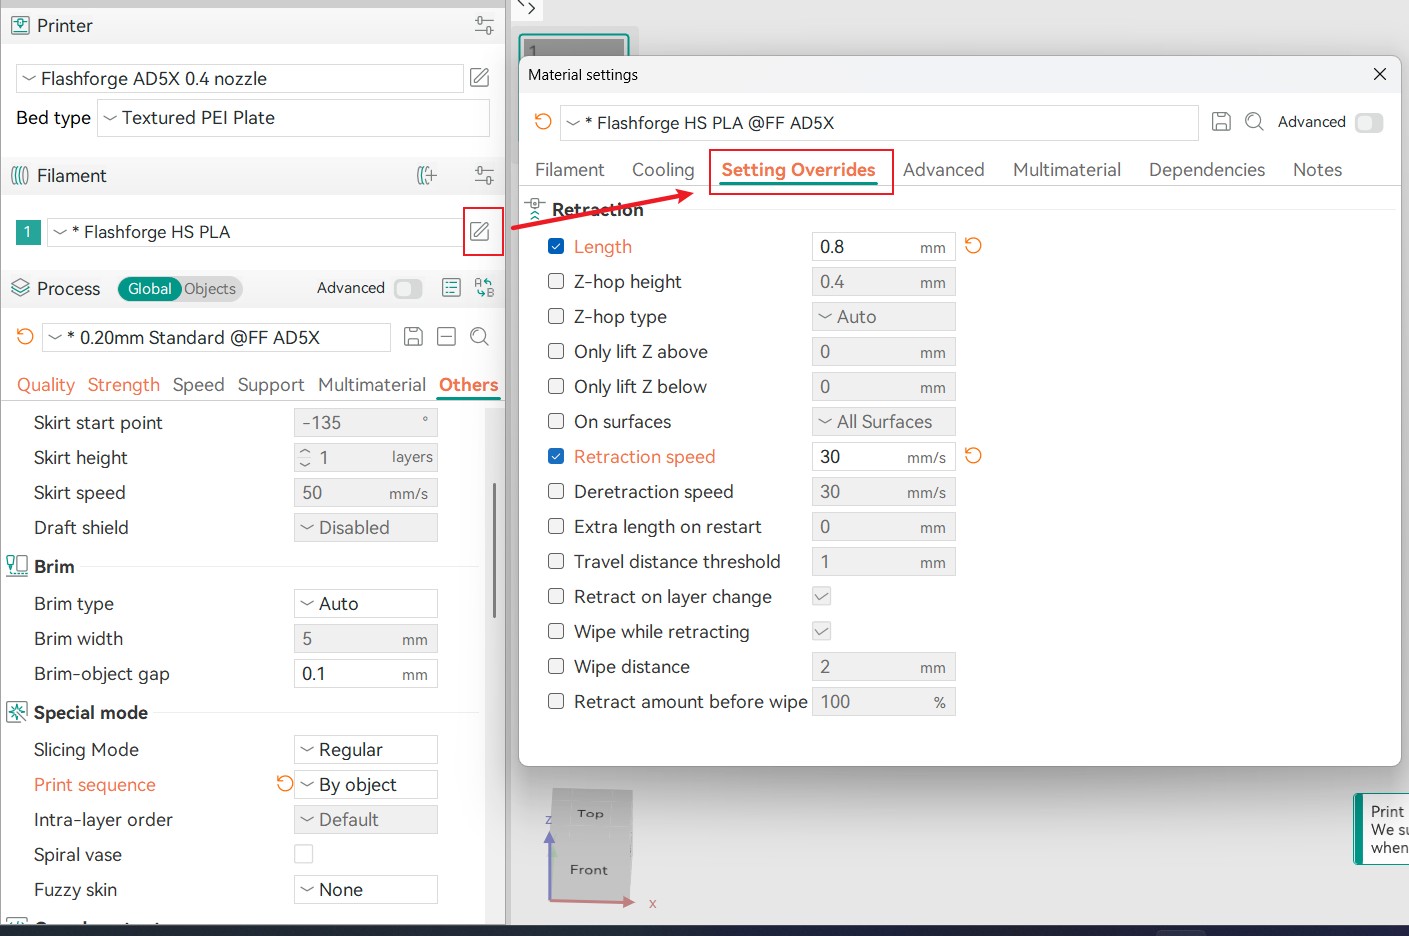
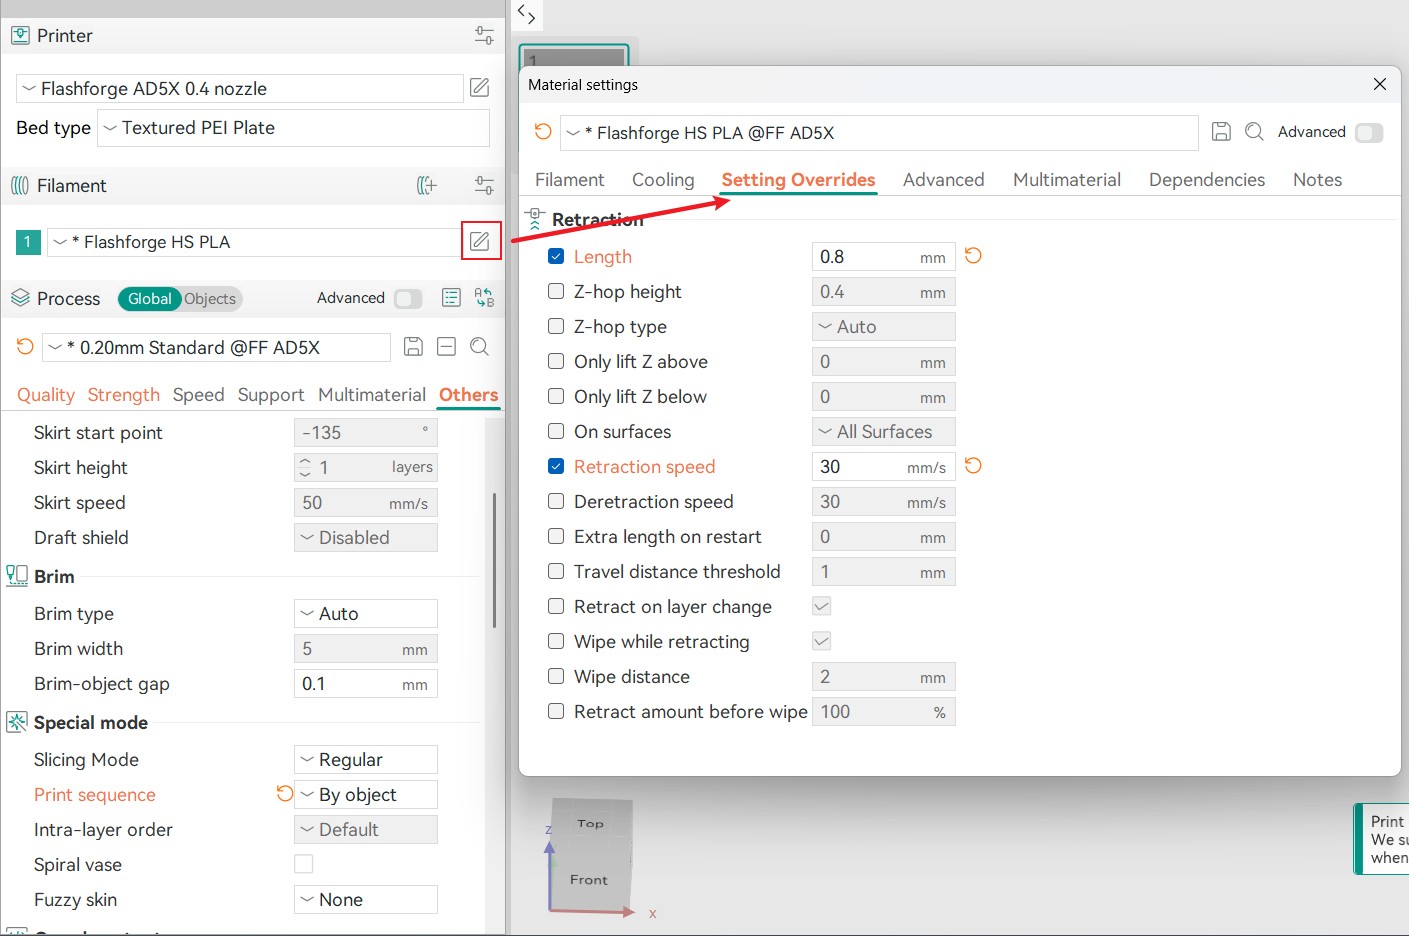
- Optimize retraction parameters
- Consider slightly increasing retraction distance and speed. Keep retraction distance below 2mm whenever possible.
- Recommended retraction speed: 40-60 mm/s. Too slow reduces effectiveness; too fast may cause filament grinding or breaking.
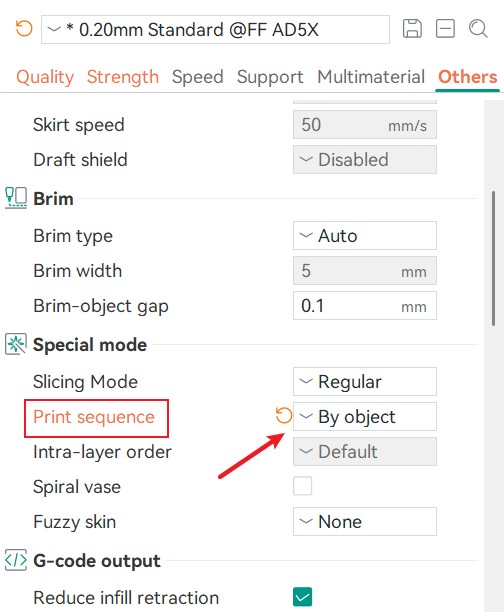
- Adjust the print order
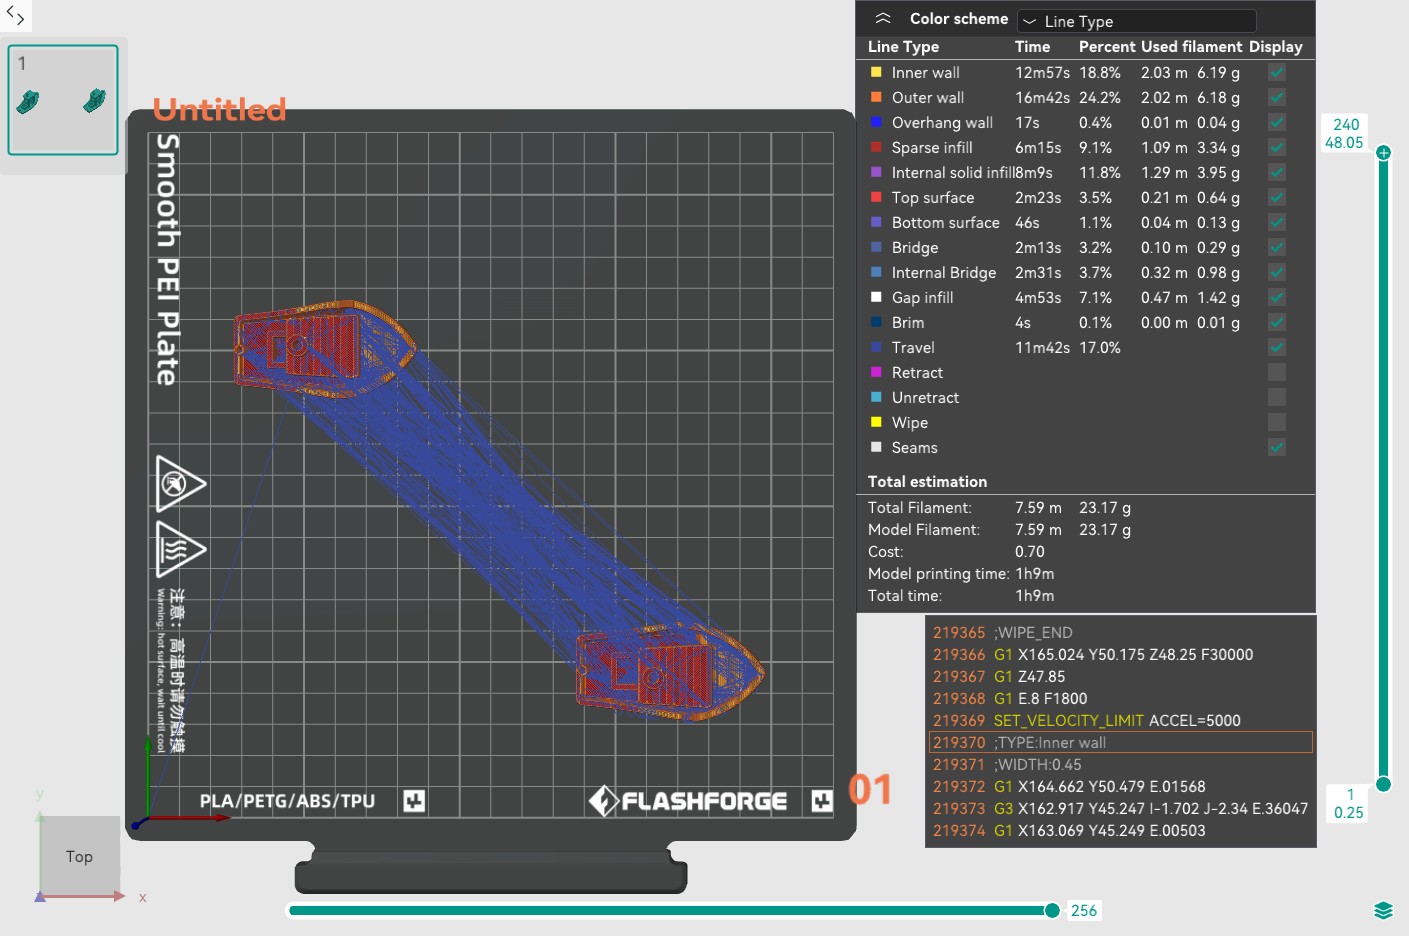
- Change the Print sequence from "By layer" to "By object" to reduce long travel moves and minimize the risk of nozzle buildup.

- Change the Print sequence from "By layer" to "By object" to reduce long travel moves and minimize the risk of nozzle buildup.
¶ Under-Extrusion
Issue
Cause Analysis
This is usually caused by insufficient extrusion, categorized as overall under-extrusion (entire model is sparse, thin, gappy) and local under-extrusion (gaps, holes, or weak layers occur in specific areas).
Solutions
-
Overall under-extrusion
This is usually a systemic issue that affects the entire print.- Filament issues
- Incorrect filament diameter: If the actual filament diameter is larger than the nominal value (e.g., labeled as 1.75mm but measured at 1.80mm), the extruder may struggle to push the filament due to excessive resistance.
Solution: Measure the filament with calipers and enter the measured diameter (e.g., 1.80mm) in the slicing software. - Wet filament: Common with PLA, PETG, and nylon. Wet filament produces bubbles when being heated, resulting in unstable and intermittent extrusion.
Solution: Dry the filament using a filament dryer (e.g., PLA at 50°C for 4-6 hours). - Poor filament quality: Large diameter fluctuations or excessive impurities can directly cause inconsistent extrusion. It is recommended to replace the filament.
- Incorrect filament diameter: If the actual filament diameter is larger than the nominal value (e.g., labeled as 1.75mm but measured at 1.80mm), the extruder may struggle to push the filament due to excessive resistance.
- Extruder issues
- Extruder gear slipping or wear: Worn or flattened gear teeth cannot properly grip the filament.
Solution: Clean debris from the gear; replace worn gears if necessary. - Excessive resistance in the filament path: Aged PTFE tubes, tight bend radii, or rough inner surfaces can significantly increase extrusion resistance.
Solution: Replace the PTFE tube.
- Extruder gear slipping or wear: Worn or flattened gear teeth cannot properly grip the filament.
- Hotend issues -
- Print temperature too low: This is the most common cause. If the temperature is insufficient, the filament does not fully melt, resulting in high viscosity and poor flow.
Solution: Print a temperature tower to find the optimal temperature for the filament; increase by 5-15°C. - Partial nozzle clog: Caused by carbonized debris, dust, or filament residue.
Solution: Perform a cold pull or clean the nozzle with an unclogging pin tool while in a heated state. - Heat creep: A failing or inefficient cooling fan allows heat to travel upward, softening filament prematurely in the heat break and causing blockages.
Solution: Ensure the hotend cooling fan (not the part cooling fan) is functioning properly and airflow is unobstructed. Check that the heatsink and heat break are making good contact.
- Print temperature too low: This is the most common cause. If the temperature is insufficient, the filament does not fully melt, resulting in high viscosity and poor flow.
- Slicing and calibration issues
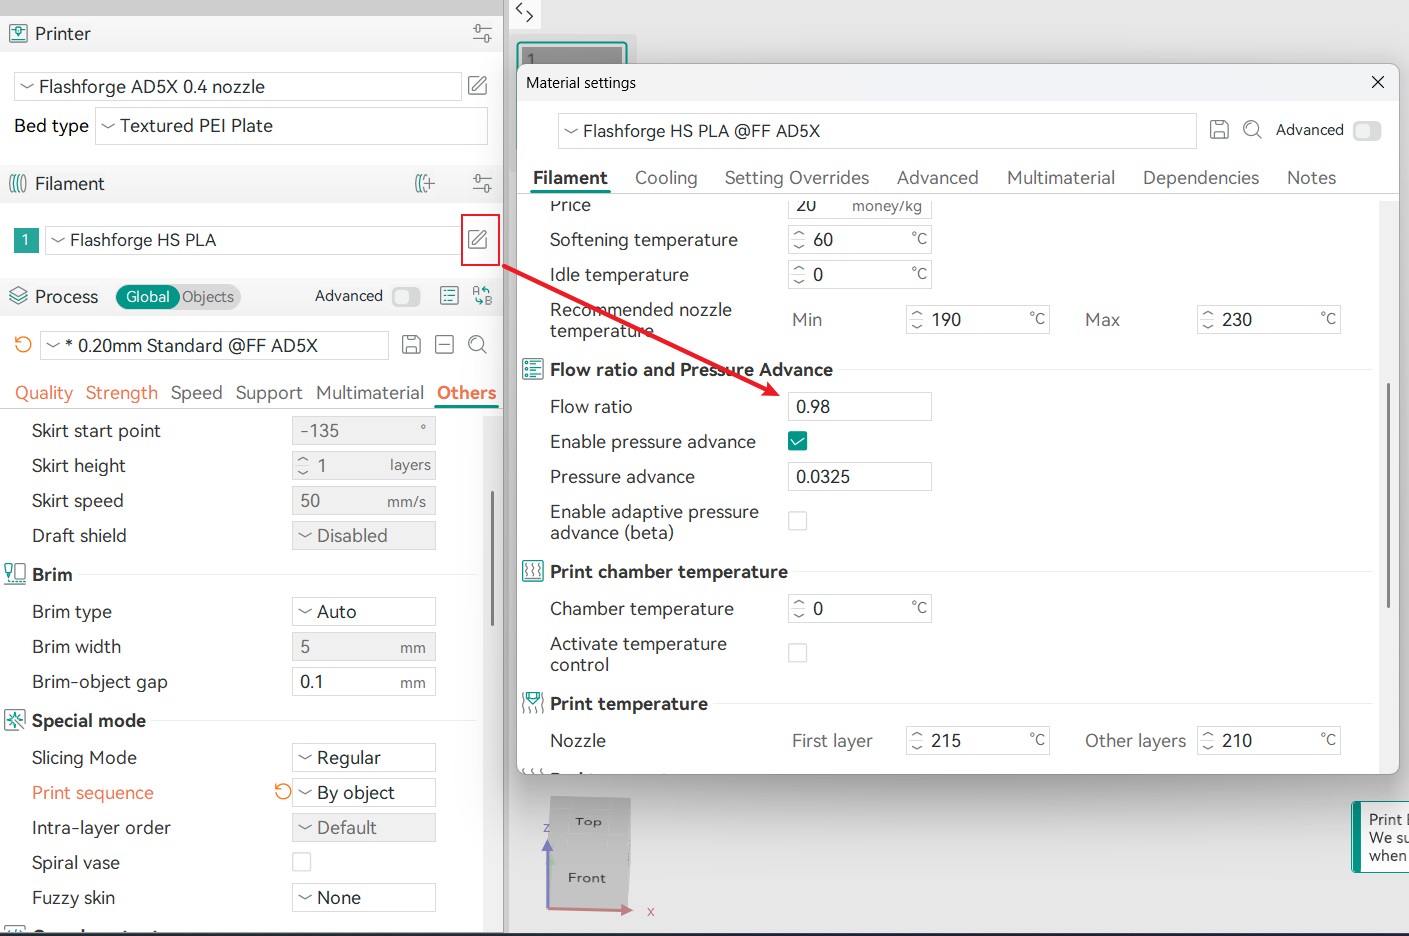
- Flow rate set too low: If the entire model shows consistent under-extrusion, an incorrect flow rate may be the cause.
Solution: Slightly increase the Flow ratio in the Material settings interface.
- Flow rate set too low: If the entire model shows consistent under-extrusion, an incorrect flow rate may be the cause.
- Filament issues
-
Local under-extrusion
This is usually intermittent or related to model geometry or slicing path.- Excessive retraction settings: Overly long retraction distances or very high retraction speeds can pull too much filament back, causing a delay when extrusion resumes and leaving gaps.
Solution: Optimize retraction settings. Recommended values for PLA:
Retraction distance: 1.2-1.6mm
Retraction speed: 40-60mm/s
- Print speed too high: For small cross-sections or complex details, excessive speed, especially with high acceleration or sharp turns, can exceed the extruder's ability to maintain consistent flow.
Solution: Reduce the print speed for outer walls, small infill areas, or complex models (e.g., outer wall speed reduced to 30-40mm/s). Ensure the maximum volumetric flow does not exceed the hotend's melting capacity.
- Excessive retraction settings: Overly long retraction distances or very high retraction speeds can pull too much filament back, causing a delay when extrusion resumes and leaving gaps.
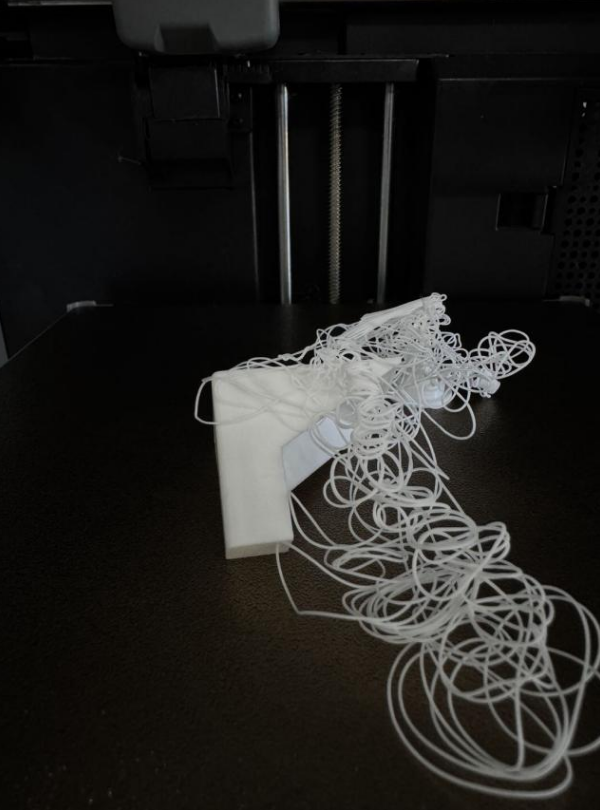
¶ Stringing or Oozing
Issue
Cause Analysis
This occurs when the nozzle extrudes more filament than necessary, causing excess filament to appear in areas where it is not intended.
Solutions
- Wet filament: When filament absorbs moisture, the water inside vaporizes during heating and forms tiny bubbles. This leads to unstable extrusion and splattering, resulting in random stringing or small blobs.
Dry the filament before printing. - Improper retraction settings: Retraction distance too short: Insufficient negative pressure is created, allowing filament to continue oozing.
Retraction speed too slow: Retraction does not complete before oozing occurs, making it ineffective.
Optimize retraction settings. Recommended values for PLA:- Retraction distance: 1.2-1.6mm
- Retraction speed: 40-60mm/s
- Poor model design or placement
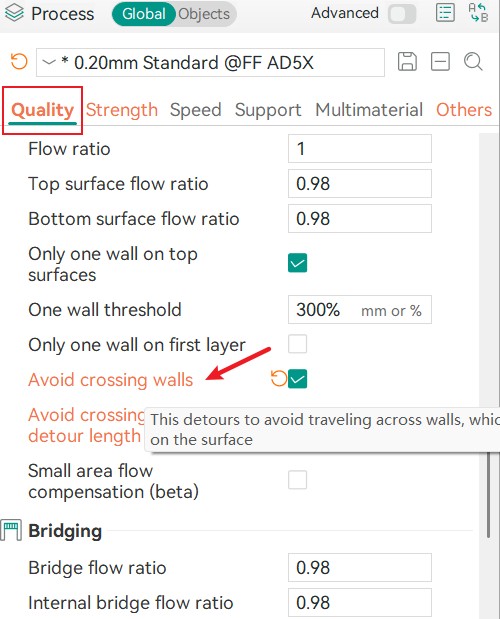
Change the Print sequence from "By layer" to "By object" to reduce long travel moves and lower the risk of stringing.
Enable Avoid crossing walls at the same time to further reduce the likelihood of stringing.
- Nozzle temperature too high: Higher temperatures make the filament thinner and more fluid, increasing the likelihood of oozing and stringing under gravity.
Lower the nozzle temperature slightly. - Nozzle configuration mismatch or wear
- Incorrect nozzle configuration: The selected nozzle preset does not match the actual nozzle installed, or a larger-diameter nozzle is used unintentionally.
- Ensure the slicing preset selected matches the actual nozzle used.
- Worn, rough, or dirty nozzle tip:
- Replace severely worn or damaged nozzles.
- Carbon buildup inside the nozzle: Affects filament flow.
- Perform a cold pull: Heat the nozzle to the printing temperature, manually feed filament, and then cool it down to about 90°C (PLA) or 150°C (PETG). Pull the filament out smoothly and firmly to remove internal carbonized debris.
- Regularly clean the nozzle tip while it is heated.
¶ Color/Gloss Differences Across Areas
Issue
Cause Analysis
Different areas experience inconsistent heating efficiency, leading to variations in molten state, flow, and surface roughness.
Solutions
- Significant differences in print speed across different areas (such as slow down for overhangs).
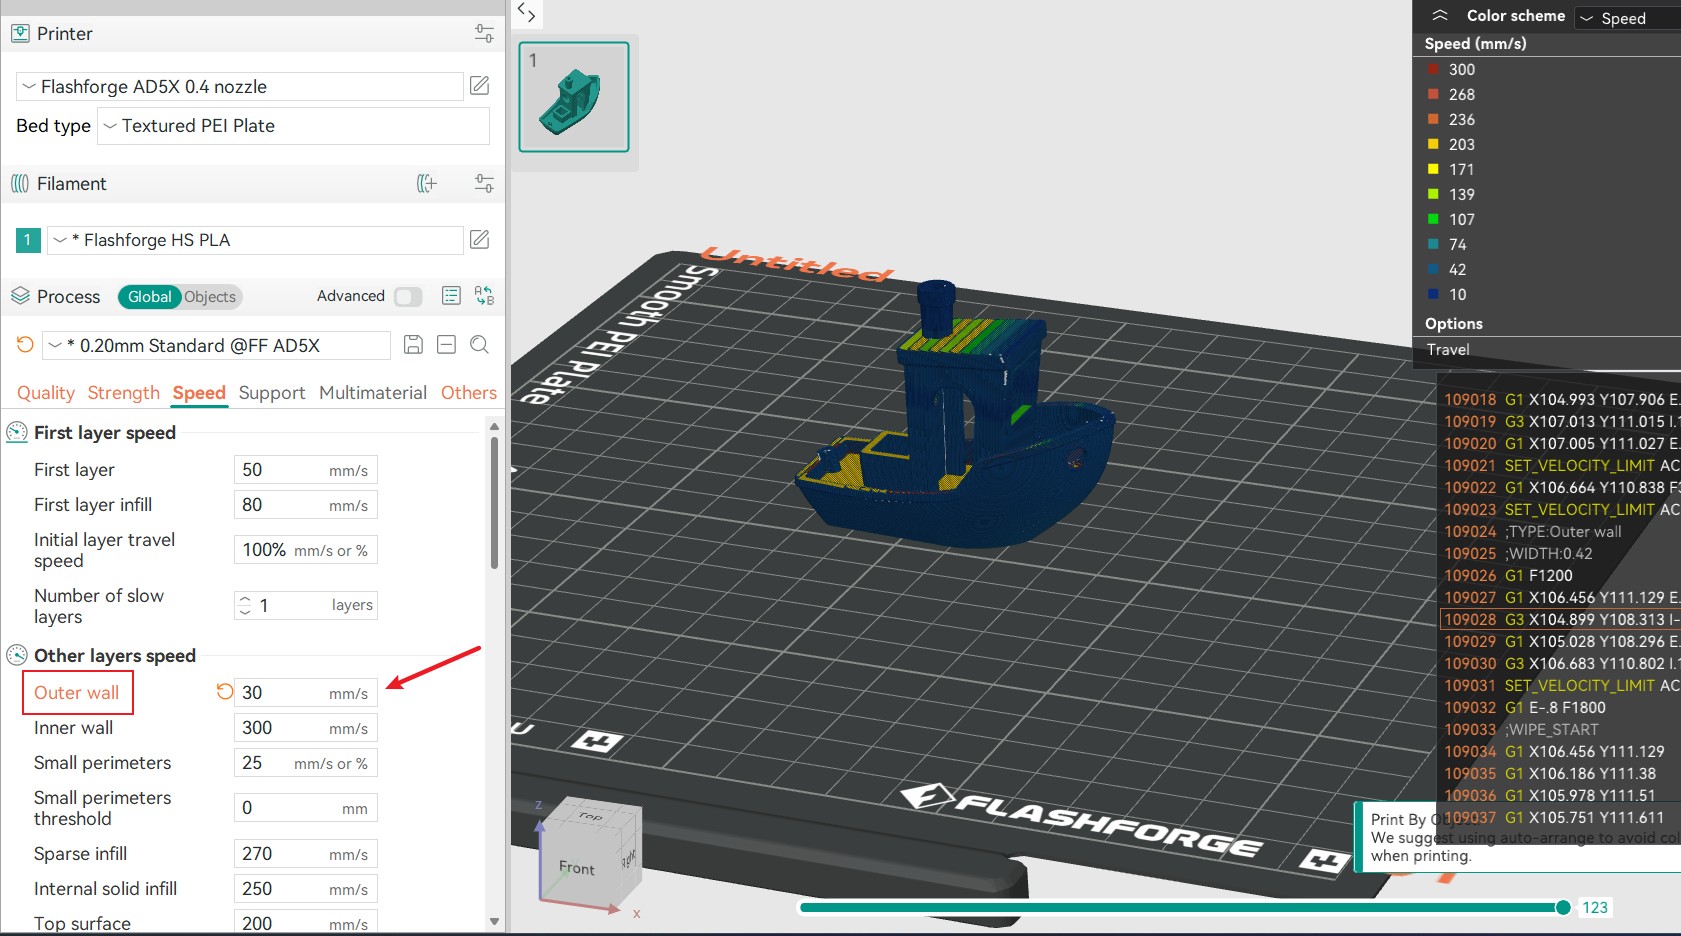
For large models, it's recommended to reduce the outer wall speed; for small models, it's recommended to reduce the overall print speed or disable Slow down for overhangs to keep the outer wall speed consistent or nearly the same.
- Using a very small layer height together with high print speeds can also lead to this issue.
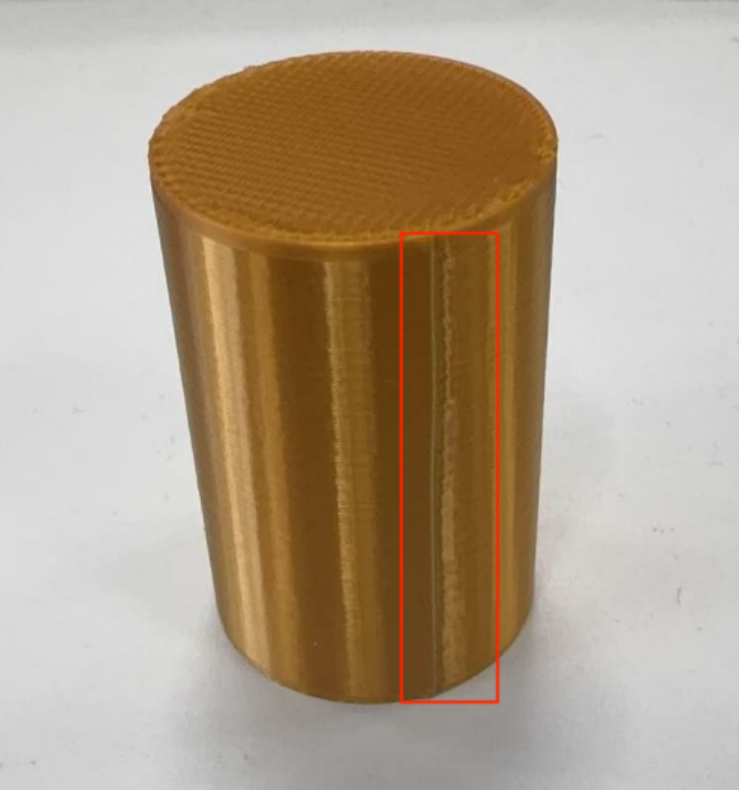
¶ Seam
Issue
Cause Analysis
Seams appear at the start and end points of each layer and cannot be completely eliminated. When the extruder completes a closed contour (such as a circular outer wall), it must move to the starting point of the next layer. During this process:
- Retract: The filament is pulled back to prevent oozing.
- Move: The extruder moves to the next layer's starting point (possibly with a Z lift).
- Resume extrusion: Filament is extruded again to begin the new layer.
This cycle of "Stop → Retract → Move → Resume extrusion" creates slight differences in material's microscopic state at the start and end points (e.g., pressure buildup, cooling time), resulting in a visible vertical line or dot-like mark on the model surface.
Solutions
While seams cannot be completely eliminated, the quality can be improved.
- Adjust the nozzle temperature and reduce the outer wall speed.
- Increase the number of wall loops appropriately.
- Avoid printing multiple models on one plate to reduce unnecessary travel moves.
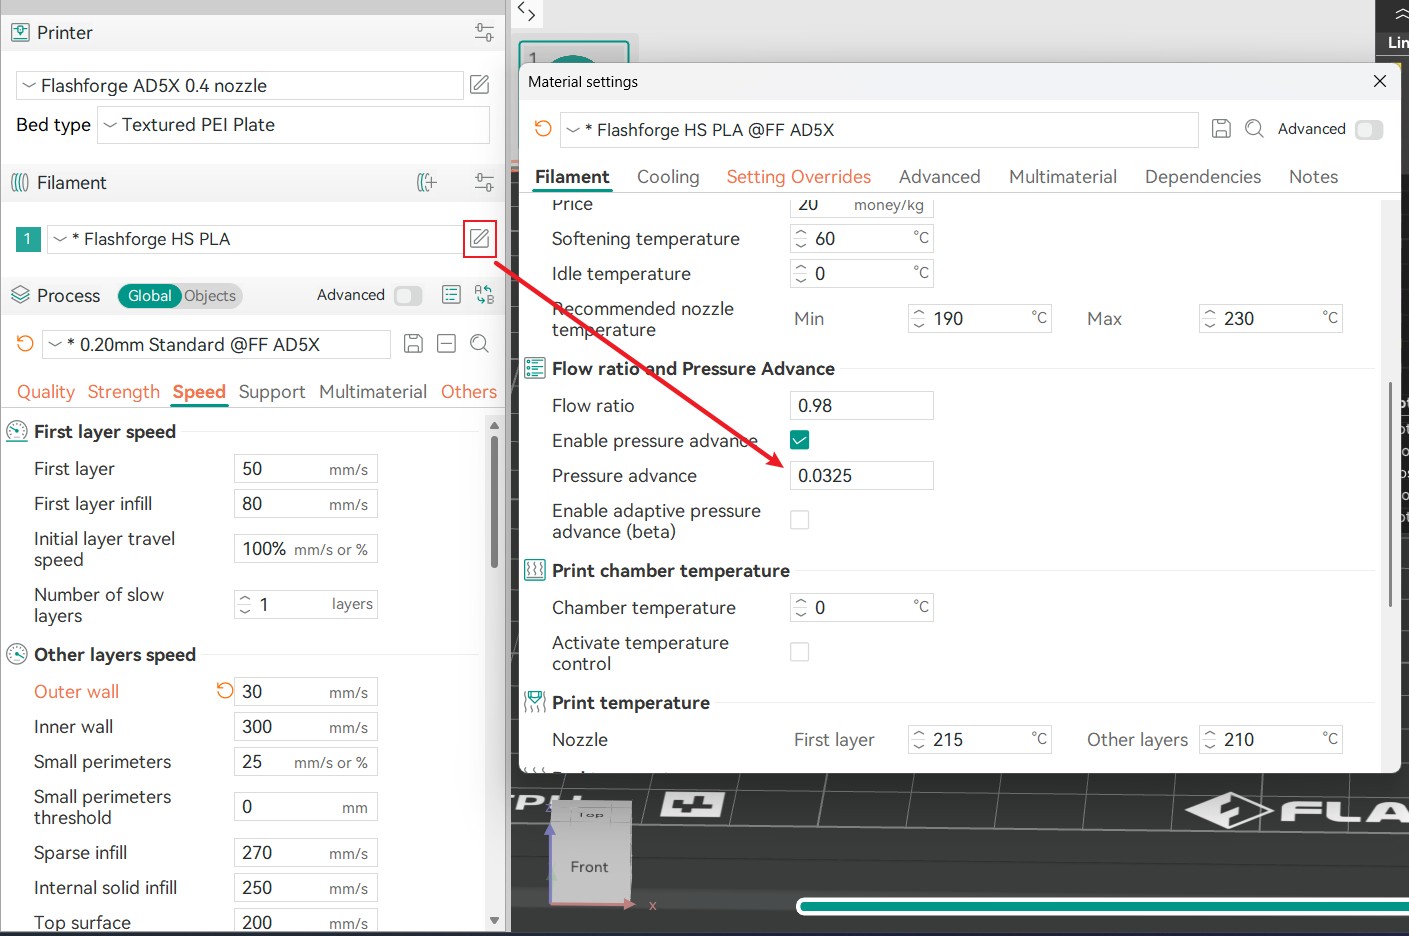
- Calibrate the "Pressure advance" value and check the option to enable it.
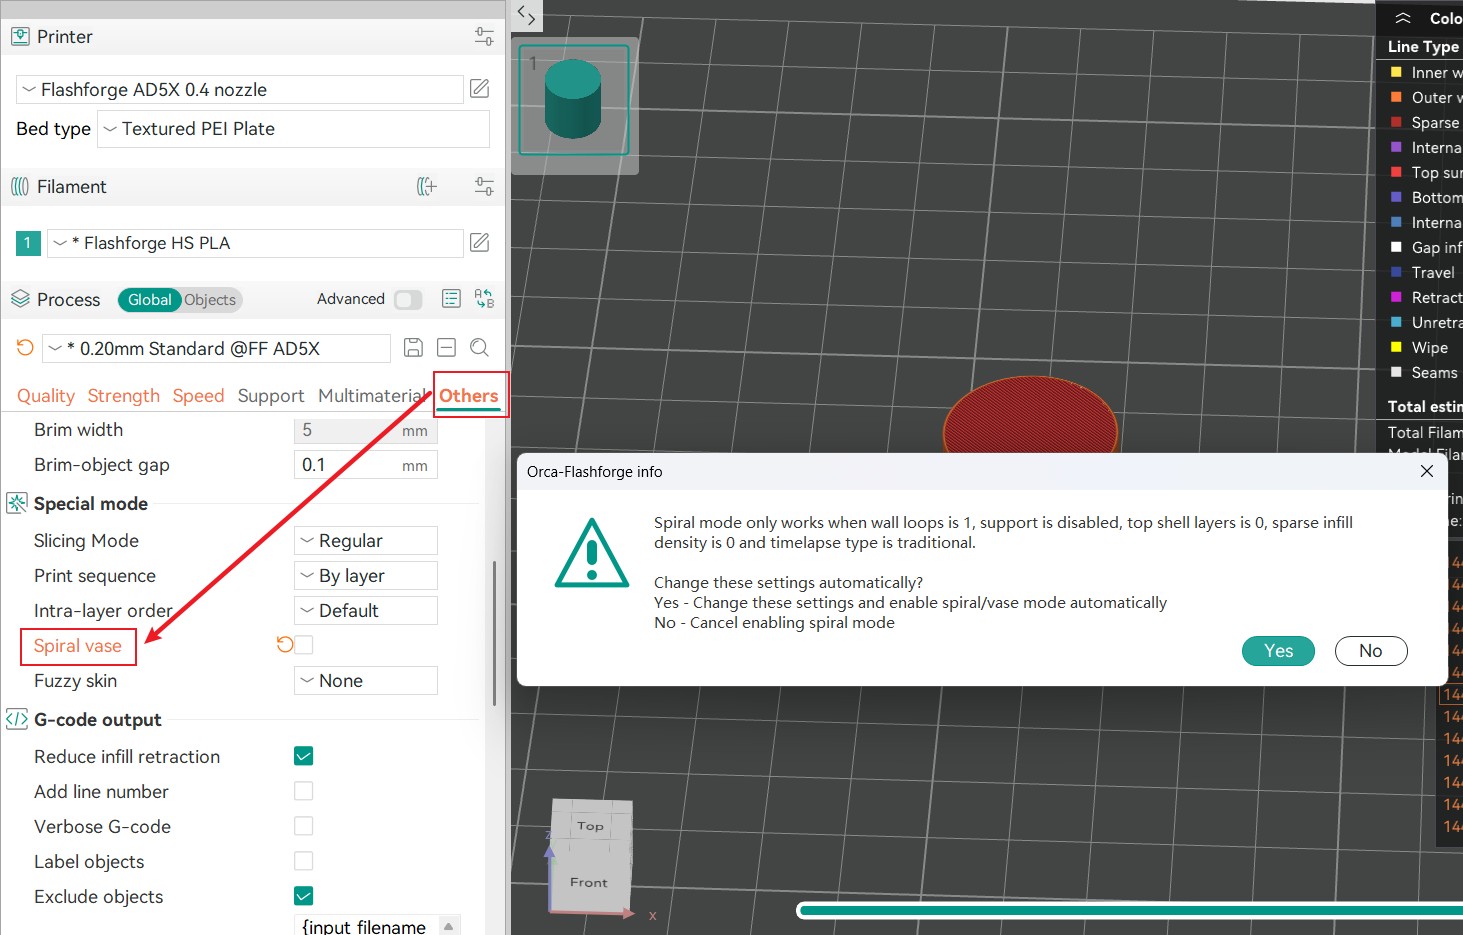
- Consider enabling the Spiral vase mode. The seams will only appear on the bottom shell layers, and not on the outer walls. Note: When this mode is enabled, the model is printed without infill and top shells. It is only suitable for simple models.
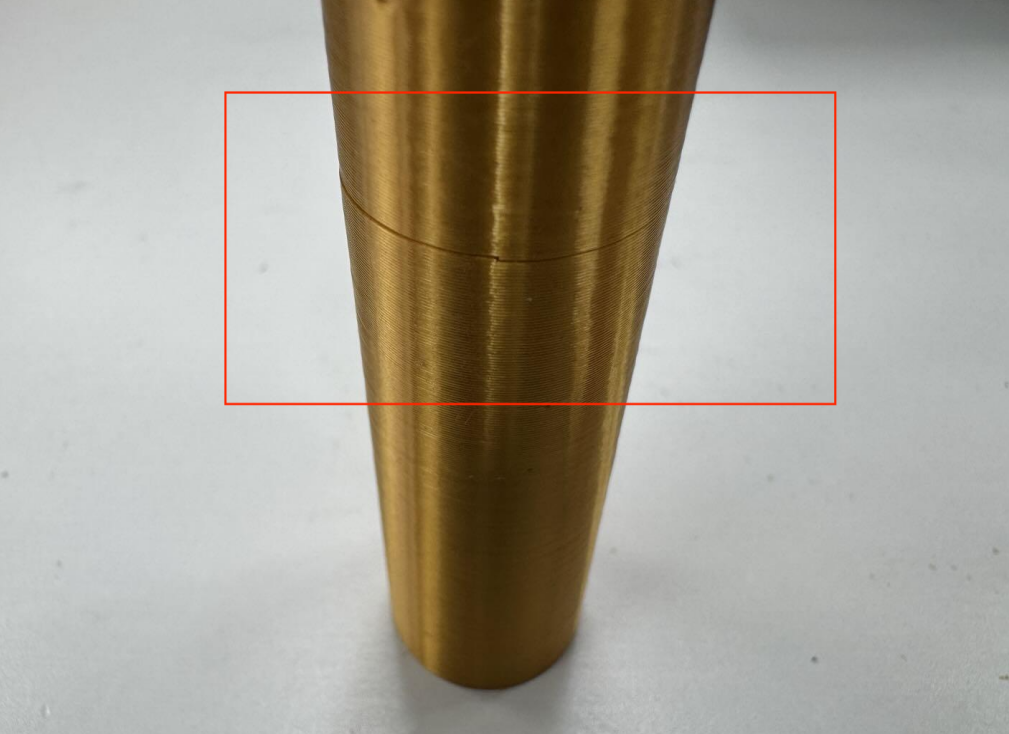
¶ Layer Separation and Splitting
Issue
Cause Analysis
The root cause is weak interlayer adhesion, which is highly dependent on filament properties: PLA has acceptable interlayer adhesion but is brittle; PETG bonds well but is overly tough; ABS and ASA are extremely sensitive to temperature and will crack if cooled too quickly; nylon (PA) has excellent layer adhesion but readily absorbs moisture, and printing with wet filament will inevitably lead to cracking.
Solutions
- Under-Extrusion: If the extruded filament is too thin, it cannot fully fill the gaps between layers.
- Insufficient filament melting, poor flow, high viscosity, small contact between adjacent layers: Increase the nozzle temperature by 5-15°C. Print a temperature tower to find the optimal temperature for layer bonding.
- Carbonized residue partially blocking the nozzle: Clean the nozzle tip while it is heated; perform a cold pull.
- The cooling fan is too strong or enabled too early, removing too much heat and causing layers to solidify before proper thermal fusion can occur:
- For ABS/ASA/PC: Turn the cooling fan off completely.
- For PLA: Keep the fan off for the first 3-5 layers, and then enable it at no more than 50%.
- For PETG: Use very low fan speeds (10-30%).
- Low filament bonding strength or weak local model structure:
- Increase the number of wall loops and infill density appropriately.
- Increase the number of wall loops and infill density appropriately.
¶ Visible Layer Lines
Issue
Cause Analysis
Significant variation in layer print times causes inconsistent shrinkage.
Solutions
- Adjust the model's orientation on the build plate.
- Reduce the outer wall printing speed.
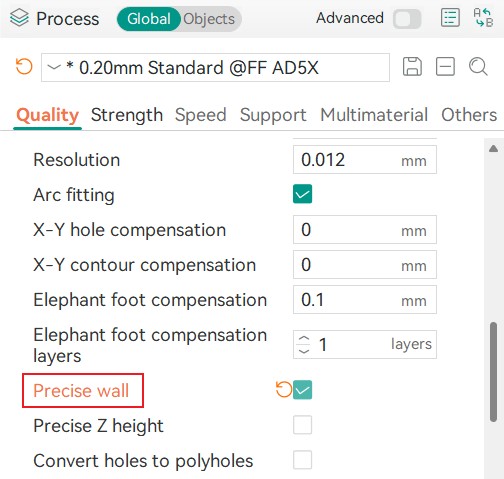
- Enable the Precise wall feature.
¶ Belt Patterns
Issue
Cause Analysis
At its core, belt patterns occur because the extruder does not move in a perfectly smooth, straight line, but instead exhibits small, periodic vibrations introduced by the belt and drive system.
Solutions
- Re-adjust the belt tension.
- Enable the printer's vibration compensation feature.
- Slightly increase the outer wall printing speed.
¶ Gaps/Overflow in Top Layers
Issue
Cause Analysis
- Incorrect flow rate setting
- Incorrect nozzle configuration
- Extruder issues
Solutions
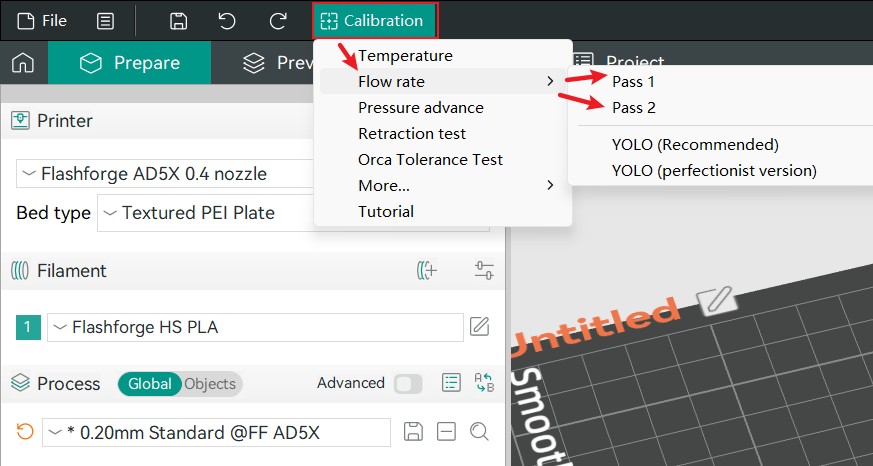
If the flow rate is set too high or too low, overflow or gaps will occur. Flow rate can be adjusted via coarse and fine tuning in Orca-Flashforge (refer to specific tutorials).
Ensure the slicing preset selected matches the actual nozzle used.
Disassemble the extruder to check for worn gears or debris, and clean or replace components as needed.