¶ 1. Under-extrusion During Printing
Cause 1: Impurities in the filament or mismatch between the model printing temperature and filament temperature
Solution:
- Replace the filament with a new one.
- Set the correct printing temperature based on the recommended temperature indicated on the filament box.
Cause 2: Carbonized filament buildup on the nozzle
Issue: During manual filament feeding, the extruded filament diameter is less than 0.45mm. The normal diameter shall be around 0.5±0.03mm.
Solution: Replace the nozzle.
¶ 2. Layer Lines on 3D Prints
Cause 1: Z-axis movement is not smooth.
Issue: Abnormal noise or jamming during Z-axis up-and-down movement.
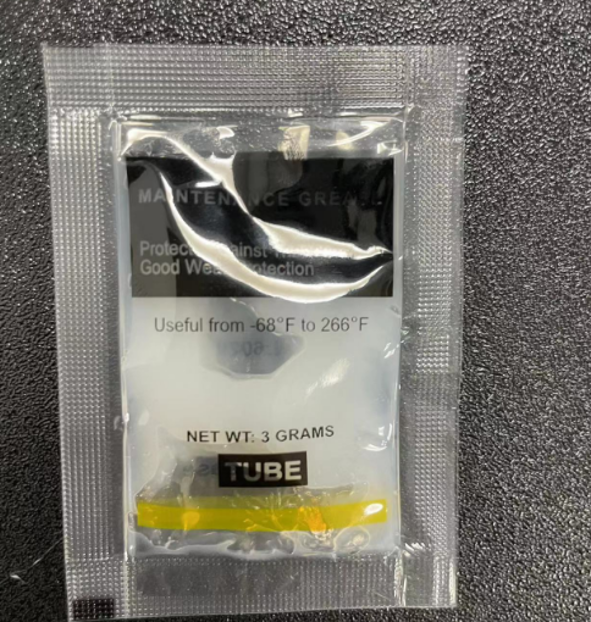
Solution: Apply grease to the Z-axis lead screw.
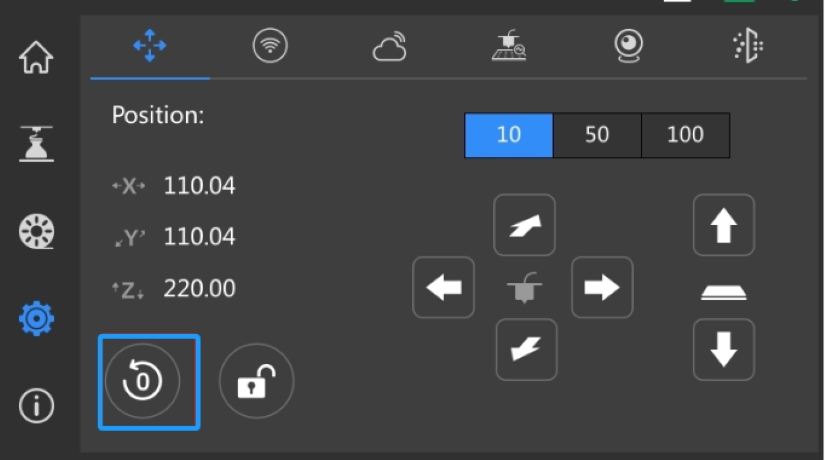
- Step 1: Open the grease and home XYZ.
 |
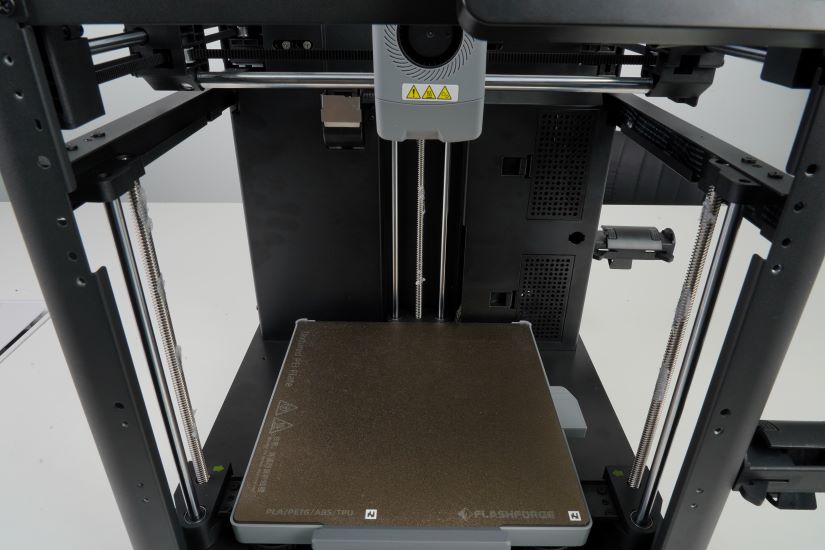
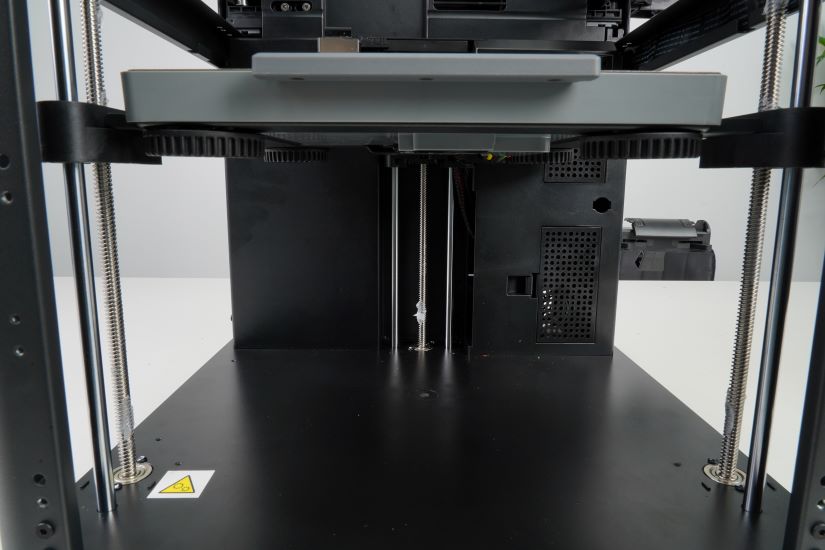
- Step 2: Apply grease to the Z-axis lead screw, ensuring even coverage.
- Step 3: Click to raise the bed (select 100 by clicking twice).

- Step 4: Apply grease under the bed.
- Step 5: Click the homing button to evenly distribute the grease on the entire lead screw. Move up and down several times.


¶ 3. Ghosting & Ringing
Cause1: Insufficient belt tension
Solution 1:
- Step 1: Retighten the belt.
- Step 2: Perform calibration and vibration compensation again.
Solution 2:
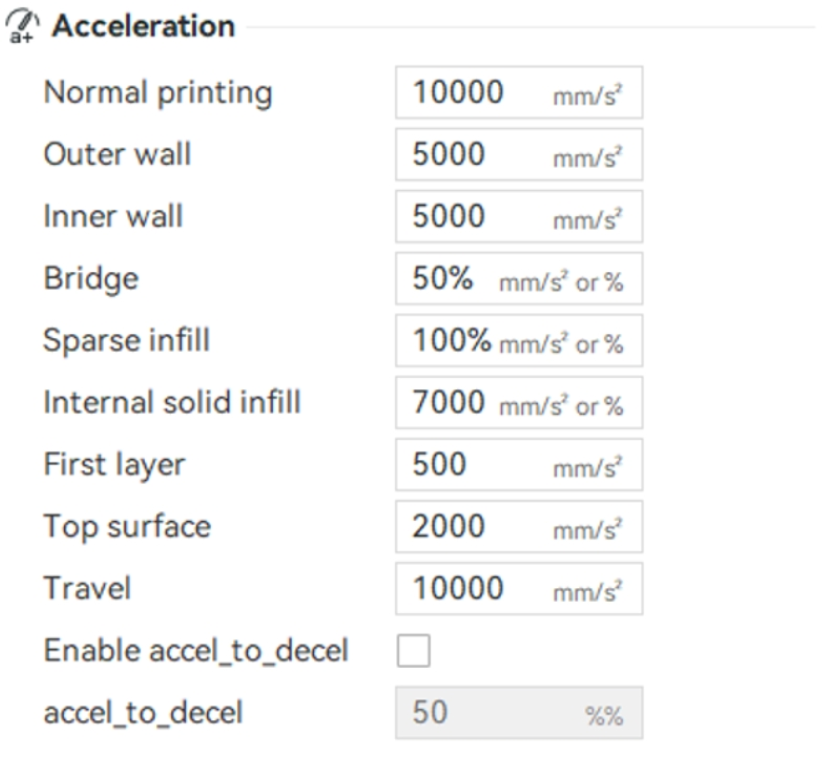
- Reduce the acceleration using Orca-flashforge via Speed → Acceleration → Normal printing.
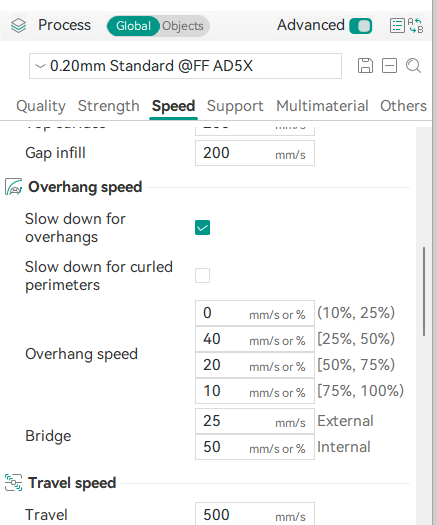
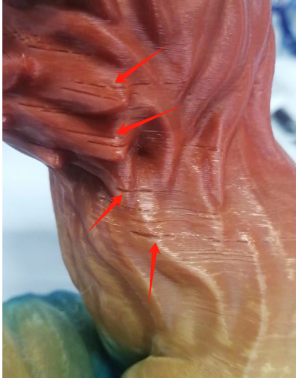
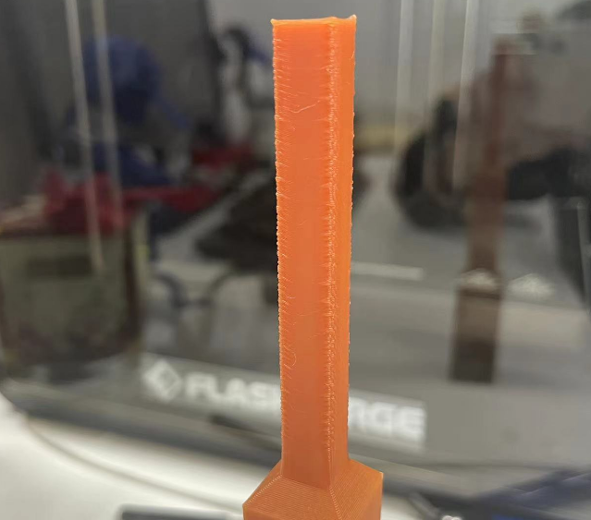
¶ 4. Droopy Overhangs
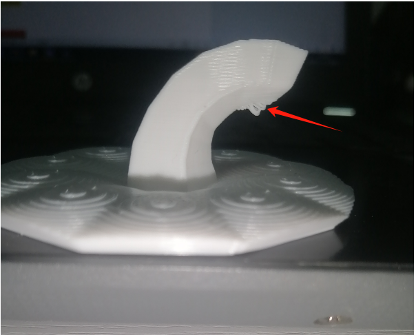
Cause 1: Overhangs at large angles
Solution 1: Enable “Slow down for overhangs” in Orca-flashforge.
Solution 2: Add supports for overhangs at an angle greater than 30°.
Solution 3: Increase the cooling fan layer time and reduce the minimum print speed in Orca-flashforge.

Cause 2: Malfunctioning cooling fan .
Solution: Please refer to the video for instructions on [replacing the turbo fan].
¶ 5. Stringing
Cause 1: Filament that has absorbed moisture can become brittle and prone to breaking (especially for PLA, PETG, and PLA-CF).
Solution : Dry or replace it with a newly unpacked filament.
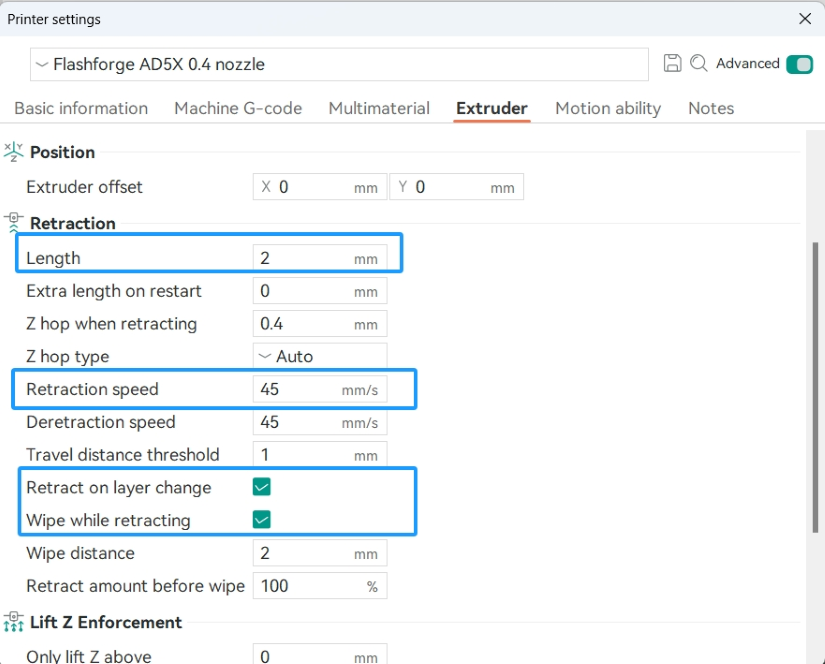
Cause 2: Insufficient retraction
Solution: Use Orca-flashforge to increase the retraction amount and retraction speed appropriately, and enable “Retract on layer change” and “Wipe while retracting”.
Cause 3: Incorrect temperature setting
Solution: Adjust the extruder temperature.
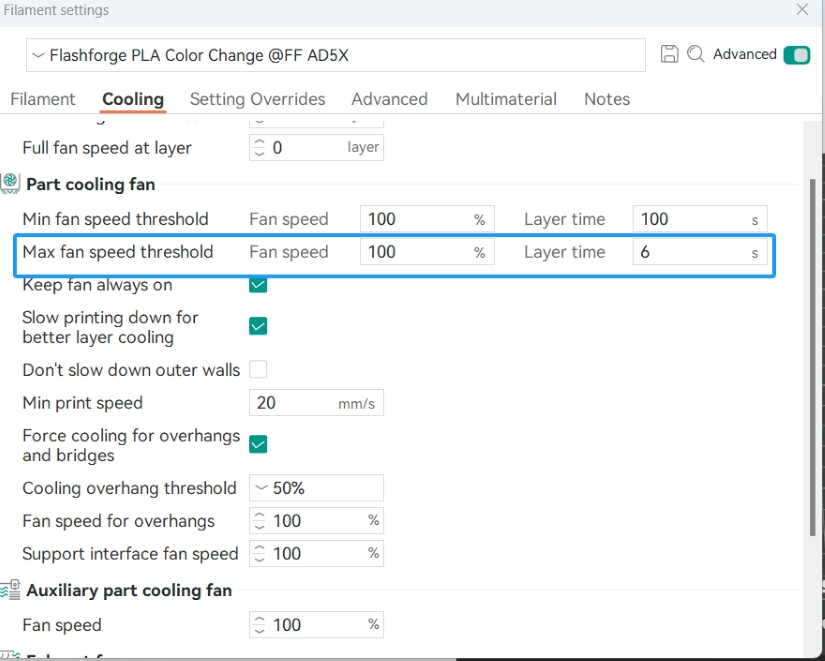
¶ 6. Roughness is Observed in Small Areas When Sliced Using FlashPrint5
Cause: Model printing speed too fast, insufficient cooling
Solution 1: Reduce the print speed in the slicer.
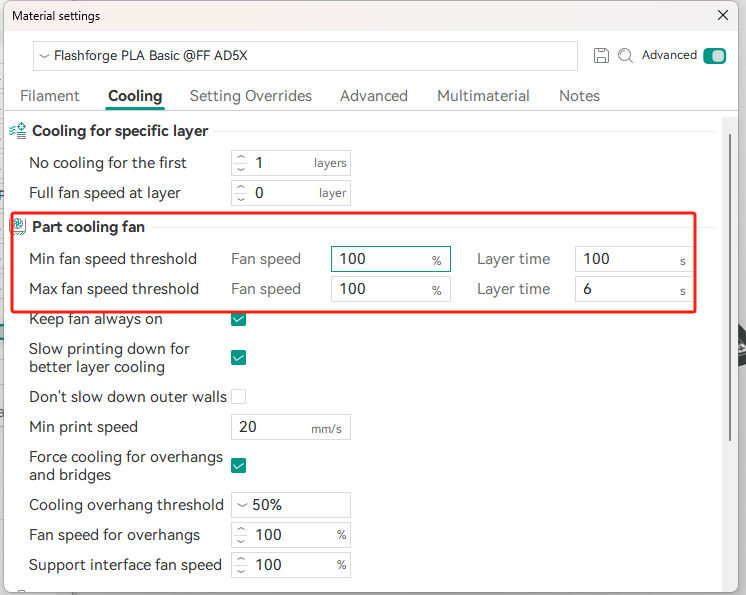
Solution 2: Adjust the “Max fan speed threshold” in the slicer to make the printer automatically slow down for smaller layer time of the model.
¶ 7.Gaps Between Infill and Outline
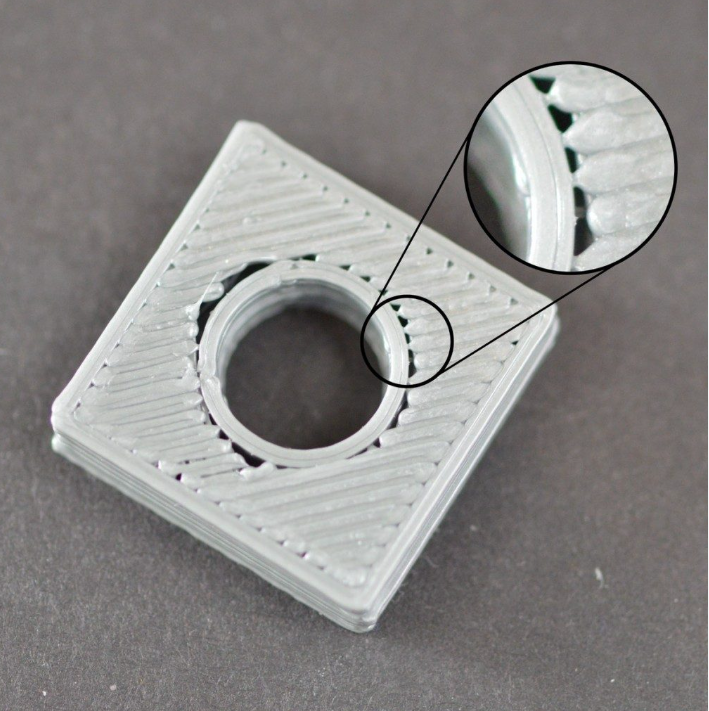
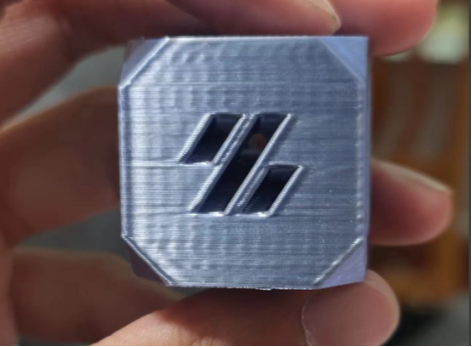
3D printed models are composed of outline perimeters and infill. Typically, a certain level of overlap between the walls
and infill is required to achieve the best bonding. Incorrect print settings can lead to visible gaps, as shown in the image,
where gaps appear at the edges between the infill and the circular hole walls.
¶ Possible Causes and Solutions
Insufficient Infill/Wall Overlap
Increasing the overlap between the infill and walls can help reduce the occurrence of gaps.
Adjust this by following these steps: Under the Process settings, go to [Strength] – [Top/Bottom solid infill/wall overlap]. A value of 25% is usually a suitable value. Be careful not to set it too high, as it may cause over-extrusion and oozing.

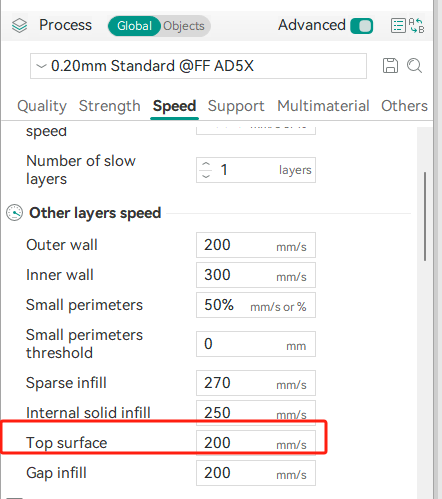
Printing Too Fast
When the print speed is too high, the material may not maintain its intended shape, especially at the edges of the infill.
Reducing the print speed for top surface can help improve this issue.
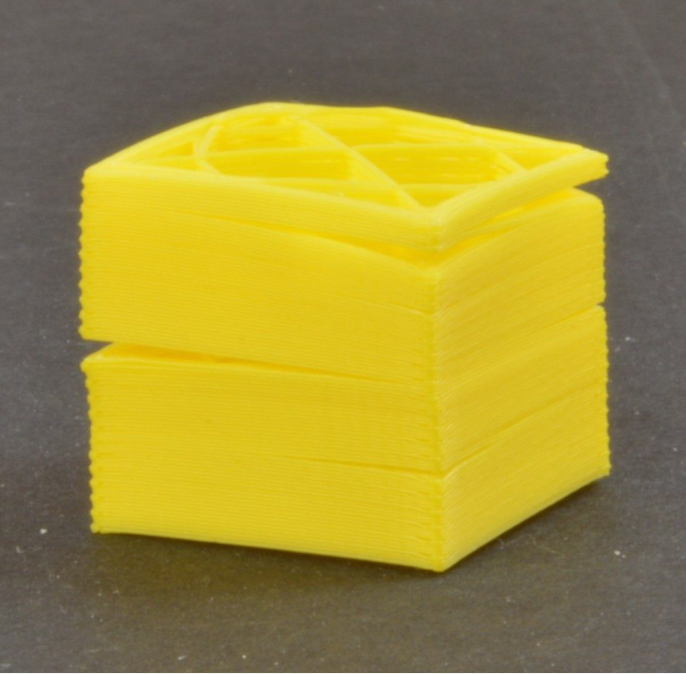
¶ 8.Overheating
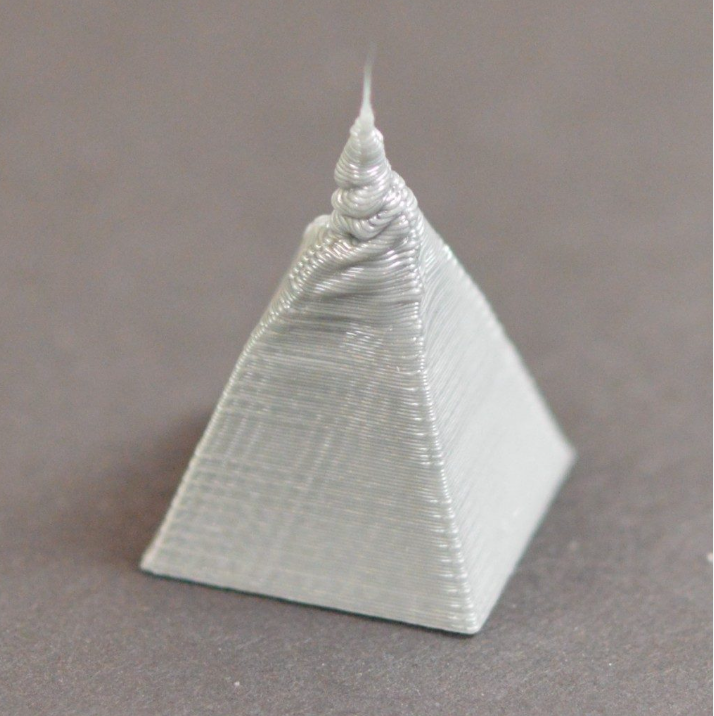
Plastic that flows from the extruder is hot enough to easily form various shapes, and it must then cool properly to maintain its shape. A balance between temperature and cooling is usually required so that the plastic can flow smoothly through the nozzle and quickly solidify to maintain the precise dimensions of your 3D printed part. If this balance is not achieved, you may start to notice some print quality issues, where the exterior of your part is not as precise and clear as desired. As shown in the image, the filament extruded at the top of the pyramid was not able to cool quickly enough to retain its shape.
¶ Possible Causes and Solutions
Insufficient Cooling
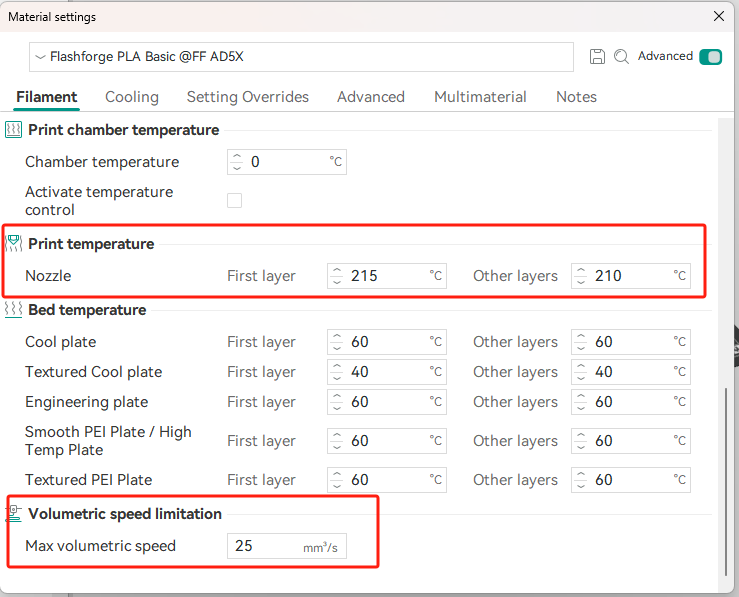
The most common cause of overheating is that the plastic is not being cooled fast enough. For many plastics, it's best to cool the layers quickly to prevent them from changing shape after being printed. If you're using the printer in the summer, ensure adequate ventilation and a suitable ambient temperature. Usually, no extra operation is needed, but if you notice signs of overheating, you can reduce the overhang speed to improve the overhang effect. You can also lower the ambient temperature or increase the layer cooling time to help. Open the Cooling option in the Material settings and appropriately increase this value—this additional cooling time will help the plastic retain its shape.
Print Temperature Too High
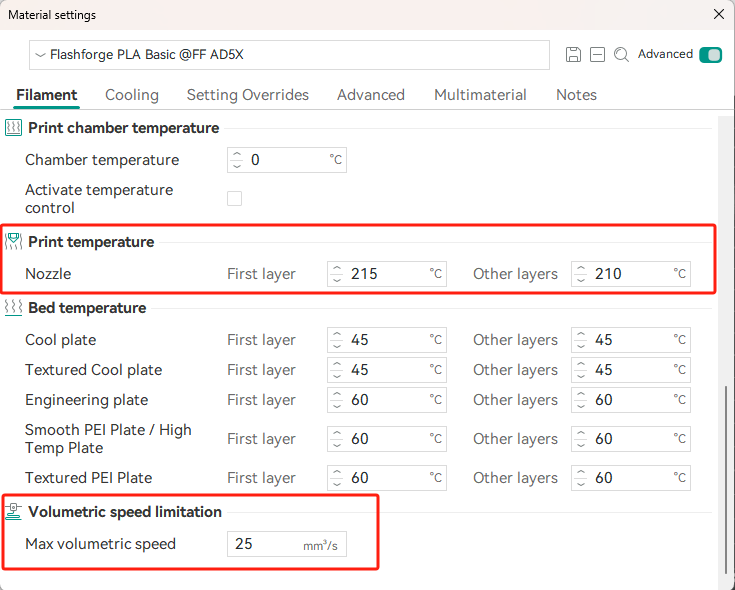
If your printer is in an optimal environment and you've tried longer layer time but still see visible overheating, try lowering the print temperature by 5-10°C to see if it helps. Be careful not to lower the temperature too much, as otherwise the plastic may not be hot enough to extrude properly or may clog the nozzle. Additionally, appropriately reduce [Max volumetric speed] in the Material settings to ensure the hotend does not print at an unreasonable temperature-speed ratio.

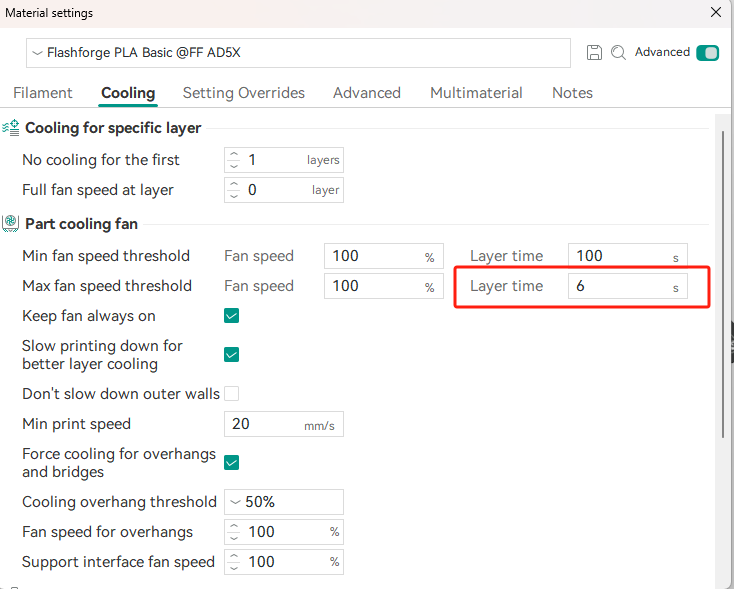
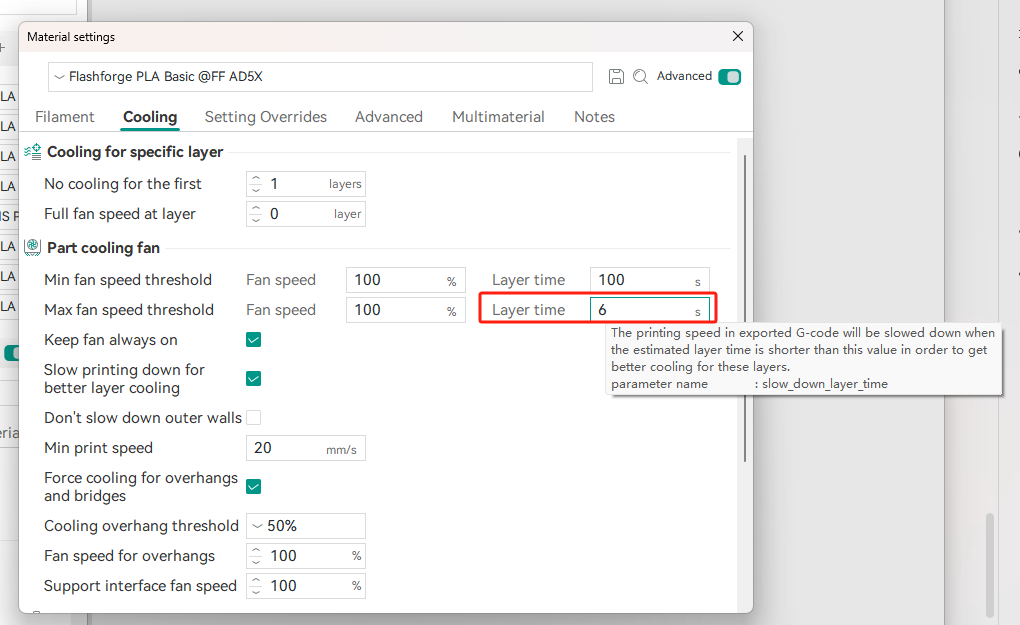
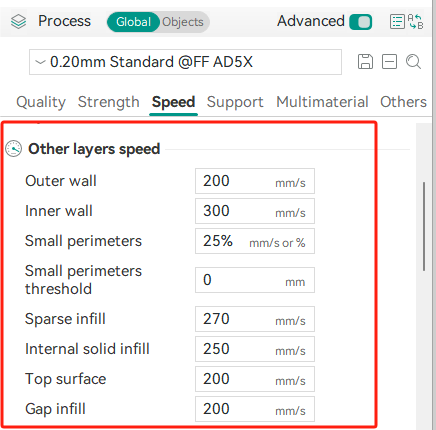
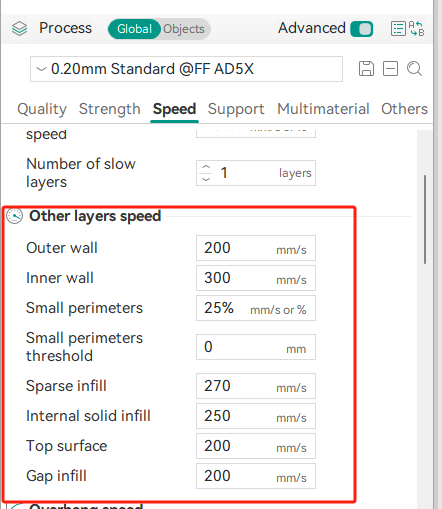
Printing Too Fast
If you're printing each layer too quickly, there may not be enough time for the previous layer to cool properly before the next layer of hot plastic is deposited on top. This is especially important for very small parts, as each layer may only take a few seconds to print. Even with a cooling fan, you may still need to reduce the print speed for these small layers to ensure enough time for each layer to solidify. If you're experiencing this, please appropriately increase the layer time as shown below.
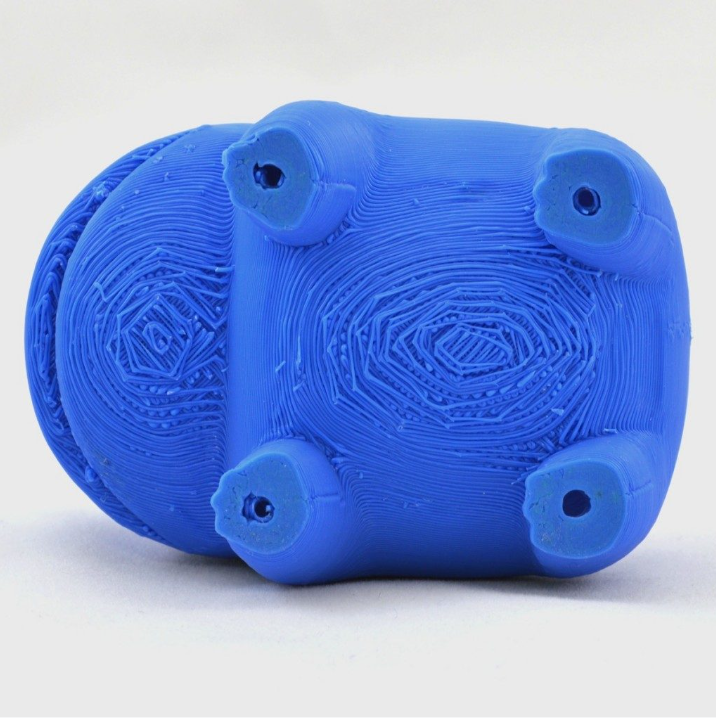
¶ 9.Weak Infill/Under-Extrusion
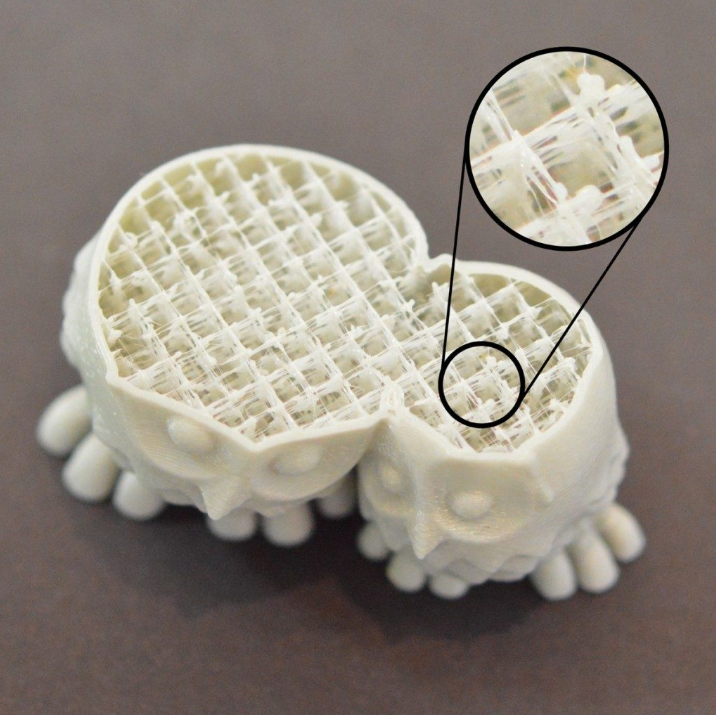
3D printer's nozzle is a consumable. When it exceeds its designed lifespan, impurities often accumulate inside the nozzle, making extrusion difficult. In addition, improper print settings/materials can cause similar issues. Weak infill or under-extrusion can reduce the model's strength and surface quality. As shown in the image, the model's infill appears to be weak.
¶ Possible Causes and Solutions:
Nozzle Aging/Clogging
When the wear and aging of the nozzle reaches a certain level, it can lead to nozzle clogging and inconsistent extrusion. Replacing the nozzle is the quickest way to resolve this issue. Be sure to follow the standard procedures for nozzle replacement.
Print Temperature Too Low/Printing Too Fast
Too low nozzle temperature or too high print speed can prevent the plastic from softening and flowing properly. The infill is typically printed faster than any other portion of your 3D print. So, if you notice under-extrusion only in the infill but not in other areas of your model, try increasing the print temperature or decreasing the print speed to improve this.
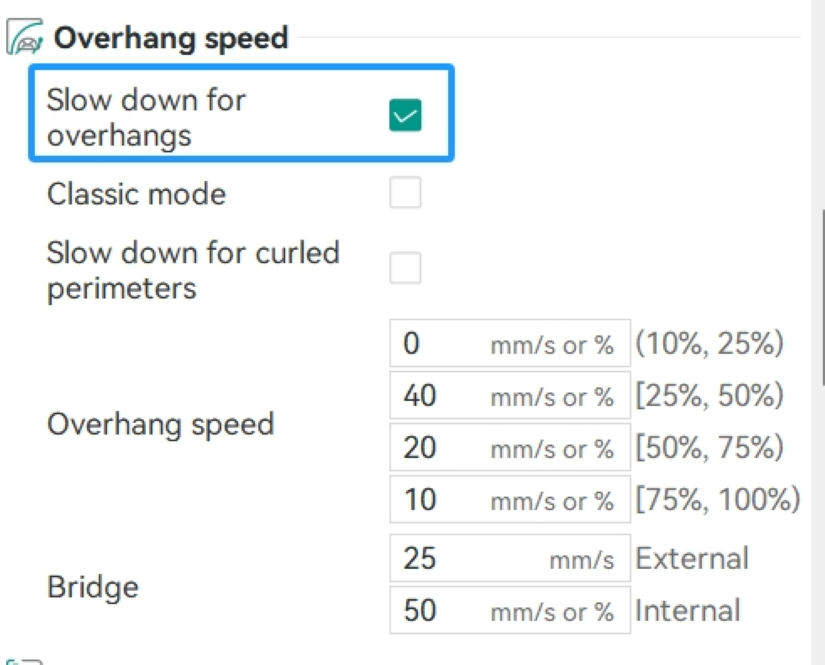
¶ 10.Stringing
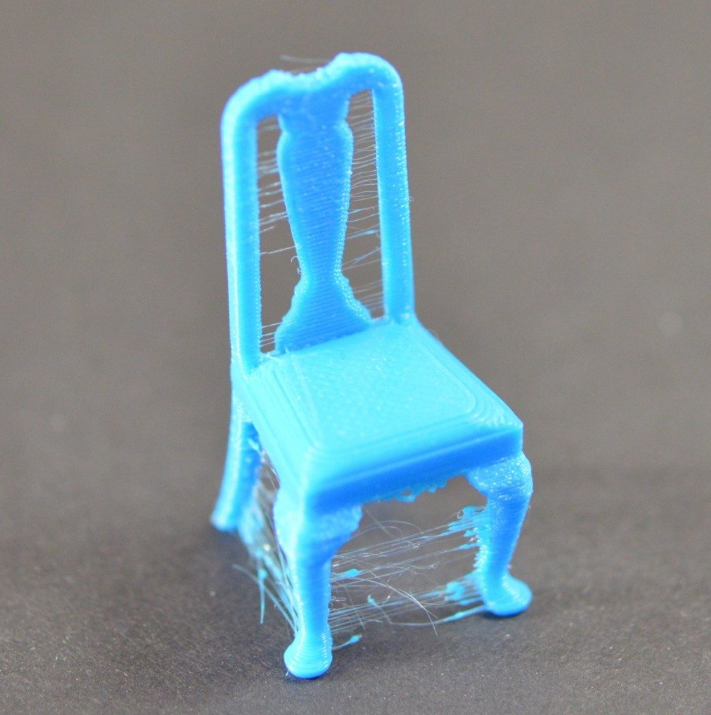
Stringing is a common yet frustrating issue in 3D printing, where plastic oozes out of the nozzle while the extruder is moving. While it's impossible to completely eliminate stringing, proper adjustments can significantly reduce it. As shown in the image, the chair model is covered in excessive stringing.
¶ Possible Causes and Solutions
Wet Filament
Some filaments, such as TPU and PVA, are highly susceptible to moisture. Even commonly used PLA can absorb moisture, leading to reduced print quality. In most cases, stringing is caused by wet filament. It's recommended to dry the filament before printing and keep it dry throughout the printing process.
Printing Too Fast
When the print speed is too high, the extrusion pressure inside the extruder may become excessive. When the extruder moves without extruding (travel moves), the pressure is released, resulting in stringing. It is recommended to appropriately reduce the print speed and nozzle temperature.

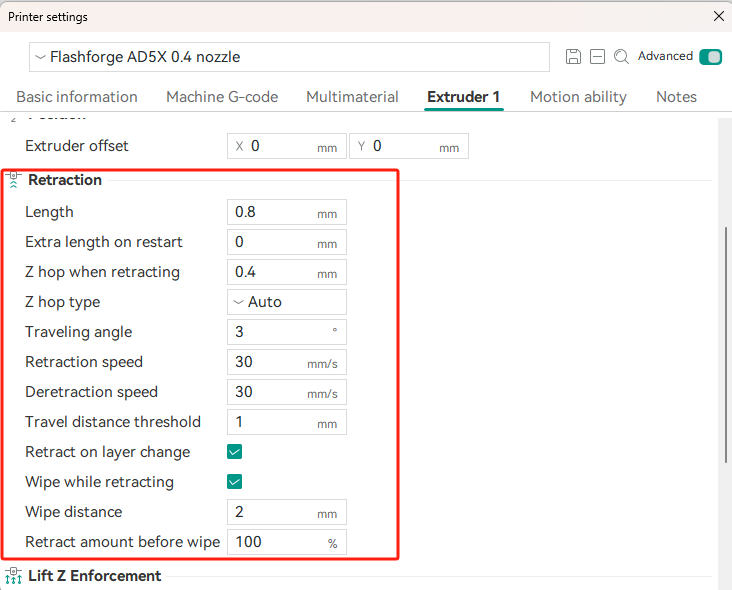
Improper Retraction Settings
Retraction plays a crucial role in preventing stringing. If the retraction distance is too large or the retraction speed is too high, it may cause missed steps. Reducing the retraction speed appropriately and fine-tuning pressure advance settings can help achieve better results.
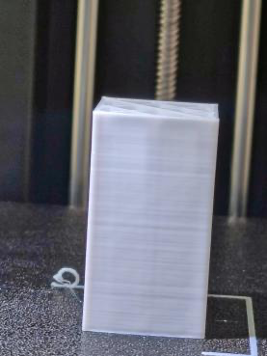
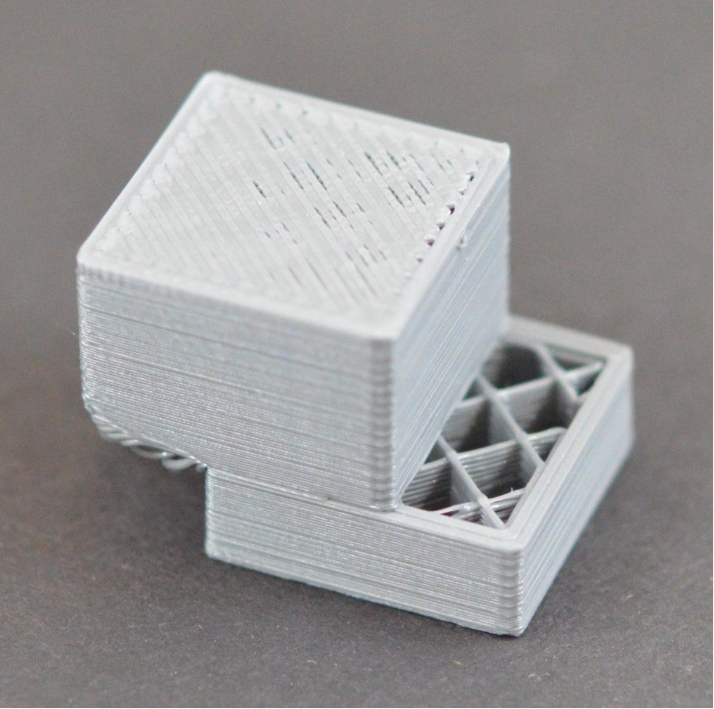
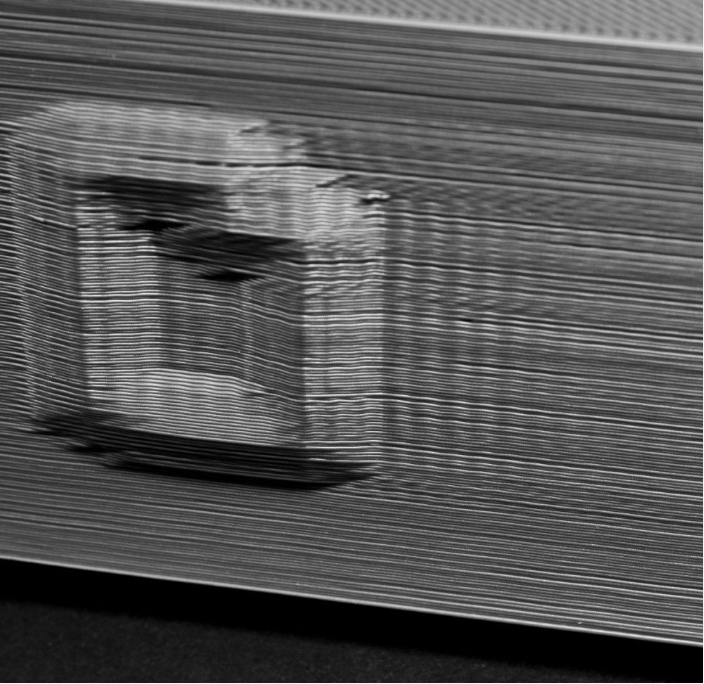
¶ 11.Layer Separation and Splitting
For plastic to melt and form properly, sufficient temperature and time are required to maintain adequate flow and layer adhesion. When printing too fast or cooling too fast, the plastic may fail to bond effectively. As shown in the image, splitting appears along the edges of the model.
¶ Possible Causes and Solutions
Printing/Cooling Too Fast
Printing too quickly or cooling too rapidly can lead to layer separation and splitting. To resolve this, try reducing the print speed. This can be achieved by increasing the layer time or decreasing the speed of individual paths. Additionally, reduce the cooling fan speed to give the plastic enough time to adhere to the previous layer.
Print Temperature Too Low
When the print temperature is too low, the plastic may not obtain enough heat to bond with the previous layer. Try increasing the print temperature or lowering [Max volumetric speed] in the material settings. This allows it to automatically lower the print speed, increasing the average heating time per unit volume of extruded material.
¶ 12.Layer Shifting
Printers typically operate within a verified speed range. If the movement speed is too high or there is physical interference during printing, the extruder may deviate from its intended path. Layer shifting is a serious issue that can potentially damage the printer. As shown in the image, layer shifting occurred during the printing process.
¶ Possible Causes and Solutions
Extruder Colliding with the Model or Other Components
During printing, the model may detach from the bed due to poor adhesion, or interference may occur due to failure to clean the previous print. This will obstruct the normal movement of the extruder, leading to missed steps. It is recommended to clean and level the bed before printing to prevent warping and avoid interference with the extruder.
Printing Too Fast
When the print speed is too high, the drive motor can generate heat. If this heat is not dissipated in time, the motor's torque will significantly decrease, leading to missed steps. This can be improved by reducing the print speed or acceleration. If higher print speeds are required, ensure proper heat dissipation for the motor and other heat-generating moving components.
¶ 13.Warping
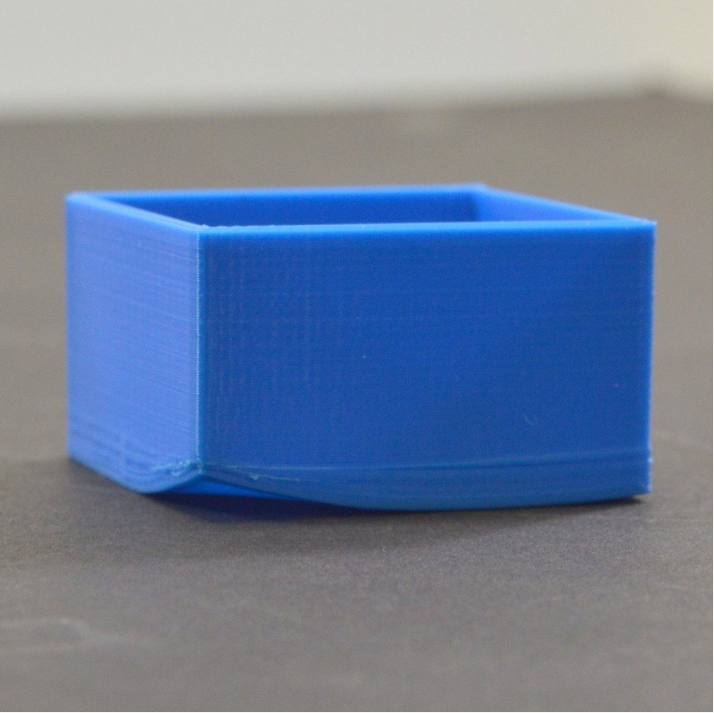
Warping is a common issue, especially when printing large models with high temperature materials such as ABS. The main reason for this problem is the fact that it tends to shrink as it cools. If there isn't sufficient adhesion to keep the model firmly attached to the bed, warping can occur. As shown in the image, warping is visible along the edges of the model.
¶ Possible Causes and Solutions
Bed Temperature Too Low / Dirty Bed
When the bed temperature is too low, the plastic shrinks more, and without adequate heat, it won't adhere well to the bed. Additionally, if the bed is dirty (e.g., with oil stains), this can negatively affect adhesion, particularly for the first layer. Increasing the bed temperature and keeping the bed clean can help. You can wipe the print area with alcohol.
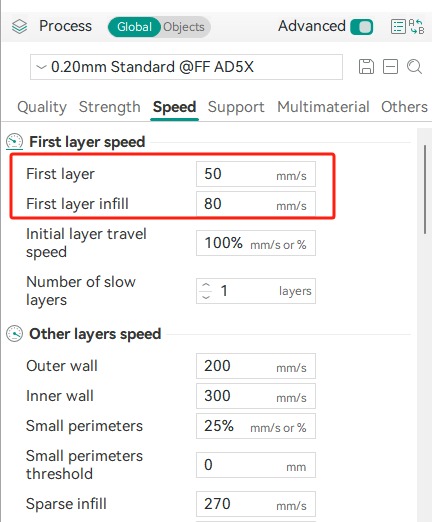
First Layer Printed Too Fast
Printing the first layer too quickly can also cause warping. High print speeds will affect the adhesion between the plastic and the bed. It is recommended to lower the print speed for the first layer.
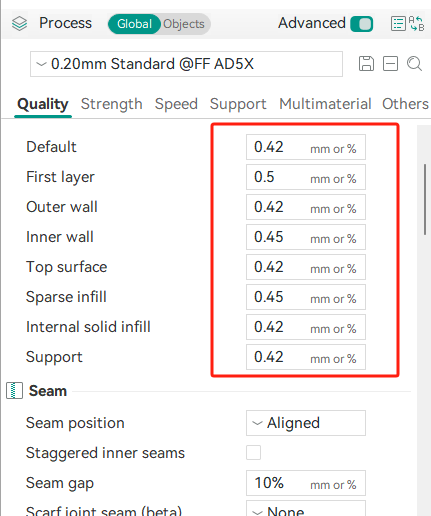
First Layer Too High
If the printer is not properly calibrated, the first layer height may be too high, preventing the material from being adequately pressed onto the bed, which reduces adhesion. This can be improved by re-leveling or manually adjusting the height of the first layer.
¶ 14.Small Features Not Printed

Typically, a nozzle can only print a limited amount of detail. When certain details of a model are too small, such as those exceeding the nozzle's minimum extrusion limit, issues with detail loss may arise. As shown in the image, the thin walls of the model were not printed.
¶ Possible Causes and Solutions
Model Details Too Small
When the details of the model are smaller than the nozzle's diameter, the slicing software will attempt to use variable extrusion width techniques to achieve printing. However, if the details exceed a certain limit, the slicing software may fail to generate G-code. If this occurs, switching to a nozzle with a smaller diameter can help achieve finer details.
Improper Extrusion Width
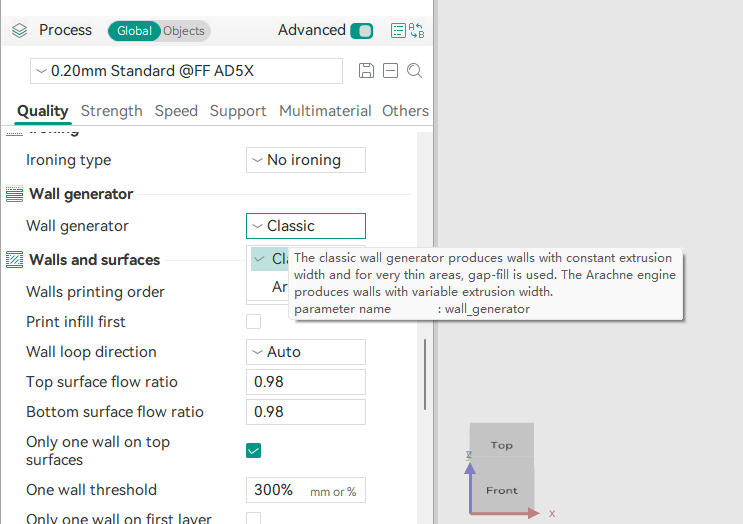
Extrusion width can be manually adjusted to better accommodate smaller details. If the extrusion width is set improperly, details may be lost. You can slightly reduce the extrusion width, allowing paths that were previously unable to be generated achievable. For example, setting a common extrusion width of a 0.4mm nozzle on a 0.6mm nozzle can yield more detailed results. Be cautious, though—setting it too small may degrade the overall model quality.
Additionally, if the issue occurs only in specific areas of the model, such as the walls, you can try modifying [Wall generator] to optimize the print. In most cases, the "Classic" mode works well, but you can also experiment with the "Arachne" mode for a more flexible wall width range.
¶ 15.Ghosting/Ringing
The moving parts of a 3D printer are typically connected by belts. During printing, the extruder constantly changes speed. When moving around corners of a model, the elasticity of the belts and mechanical resonance can cause strong ripple patterns on the edges of the model, affecting its appearance. As shown in the image, vertical ripples are particularly noticeable.
¶ Possible Causes and Solutions
Improper Belt Tension
Improper belt tension can lead to excessive vibrations. This can be improved by appropriately adjusting the belt tension.
For specific values, please contact customer support.
Printing Too Fast
Printing at too high a speed can increase vibrations. Reducing the print speed or lowering the acceleration can help mitigate this issue.
Improper Calibration
Printers include software features to suppress such vibrations. It is recommended to perform regular vibration compensation. Note that the printer should be placed on a stable platform for separate calibration as recommended.
¶ 16.Poor Surface Above Supports
When a model has significant overhangs, cooling alone is not enough to maintain its shape—supports are needed to ensure proper forming of overhangs. If the supports are not properly configured, defects can appear on the surface. As shown in the image, there is noticeable sagging in the support areas.
¶ Possible Causes and Solutions
Support Spacing Too Large
Support spacing is a parameter that controls the distance between the supports and the model. If it is set too large, it will lead to sagging overhangs. You can appropriately reduce this value, but not too small to avoid making the supports difficult to remove.

Printing Too Fast
Even with supports, printing too fast can cause overhangs to sag. Adjusting the overhang parameters appropriately can help improve this issue.