¶ 1. Bed Hitting the Extruder During Auto-leveling.
Cause: Filament residues at the nozzle tip or uncleared print bed.
Solution:
Step 1: Clean the nozzle and bed by removing the residues.
Step 2: Restart the printer and perform auto-leveling again.
Step 3: If the above steps don't work, consider checking for firmware updates. Upgrade the firmware if a new version is available and retry.
Step 4: If the above steps still don't solve the problem, please copy logs to a USB flash drive and contact customer support.
¶ 2. After automatic leveling, the extruder is too far away from the bed when printing the first layer.
Cause: Filament residues at the nozzle tip or uncleared print bed.
Solution:
Step 1: Clean the nozzle and bed by removing the residues.
Step 2: Restart the printer and perform automatic leveling again.
Step 3: If the above steps don't work, consider checking for firmware updates. Upgrade the firmware if a new version is available and retry.
Step 4: If the above steps still don't solve the problem, please copy logs to a USB flash drive and contact customer support.
¶ 3. When preheating the extruder, it doesn't heat up or the temperature displays as a negative value.
Cause: Firmware communication failure; Nozzle damaged or extruder cable in poor contact.
Solution:
Step 1: After powering on, check if the nozzle temperature display on the screen is normal. If it shows a negative or 0 value, restart the printer.
Step 2: If Step 1 doesn't work, turn off the printer again, remove and reinstall the nozzle, and then restart the printer. (See "Replacement of nozzle assembly" for instructions on nozzle removal and installation.)
Step 3: If Step 2 doesn't work, turn off the printer, open the top and rear covers of the extruder, and check for poor contact or damage to the extruder connection cable. If there's poor contact, unplug and replug the cable, and then restart the printer and retry.
Specific steps for checking the extruder connection cable are as follows:
.jpg)
Remove the front cover of the extruder.
.jpg)
Use an M2 Allen wrench to remove the four screws on the top of the extruder, and then remove the top cover.
.jpg)
Use an M2 Allen wrench to remove the two screws from the extruder board.
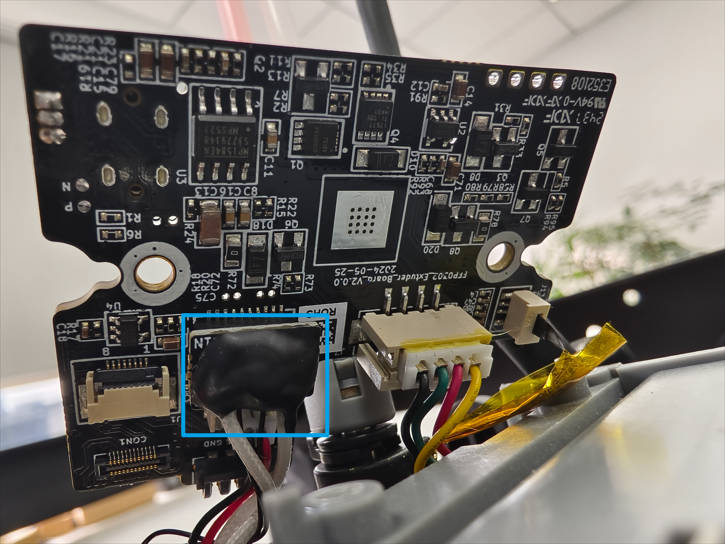
Check for poor contact at the extruder connection cable connector. Then unplug and replug it.
Step 4: If the above steps don't work, replace the nozzle.
Step 5: If the above steps still don't solve the problem, please copy logs to a USB flash drive and contact customer support.
¶ 4. Unresponsive touchscreen, no response when clicking menu options.
Cause: 1. Poor electrical connection between the touchscreen and the mainboard; 2. Defective touchscreen; 3. Mainboard issues
Solution:
Step 1: Turn off the printer and remove the rear cover of the touchscreen. Check for poor contact or damage to the touchscreen connection cable. If there's poor contact, unplug and replug the cable, and then restart the printer and retry.
Step 2: If Step 1 doesn't work, turn off the printer and remove the rear cover of the printer. Check for poor contact or damage to the touchscreen connection cable on the mainboard. If there's poor contact, unplug and replug the cable, and then restart the printer and retry.
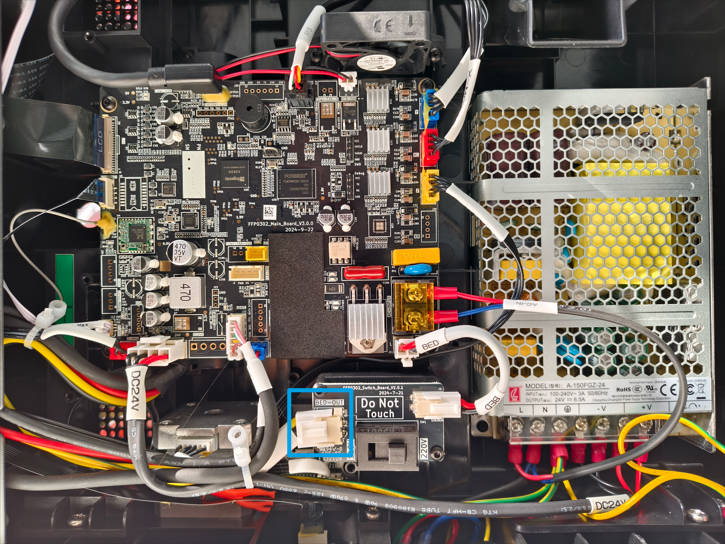
Specific steps for checking the touchscreen connection cable on the mainboard are as follows:
.jpg)
Use a Phillips screwdriver to remove the six screws shown in the image and remove the printer's rear cover.
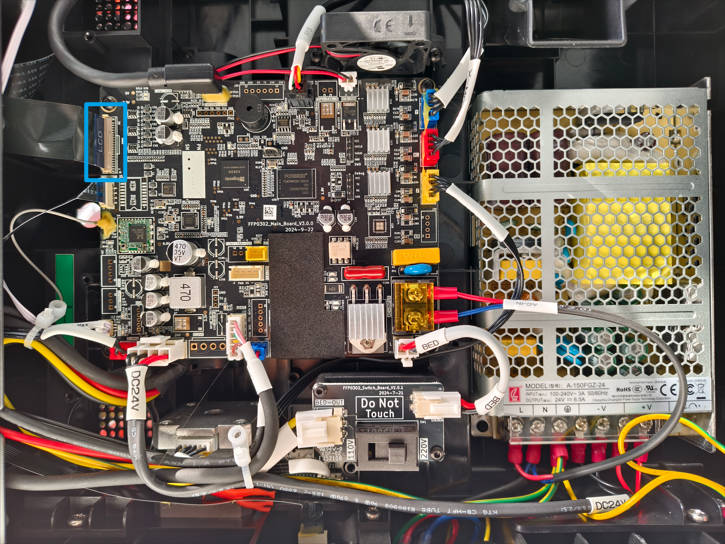
Unplug and replug the touchscreen connection cable shown in the image.
Step 3: If the above steps still don't solve the problem, please contact customer support to replace the touchscreen connection cable, touchscreen, or mainboard as needed.
¶ 5. Bed Not Heating During Preheating.
Cause: Poor cable connection or faulty bed heating assembly.
Solution :
Step 1: Restart the printer and check if it heats up normally.
Step 2: Manually raise the bed to the maximum Z-axis height, unplug and replug the cable and other connection cables, and then confirm if the print bed functions normally.
Specific steps to reconnect the cables are as follows:
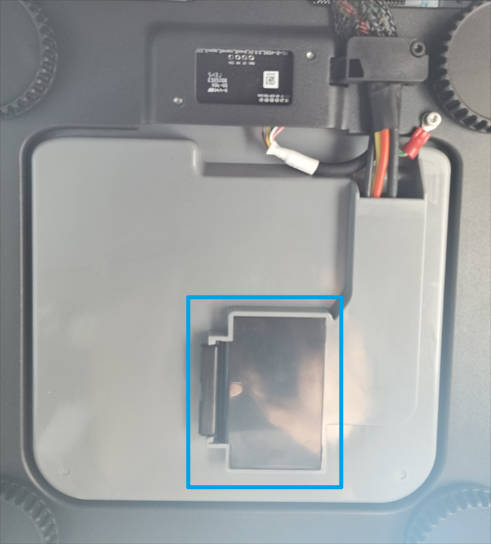
Remove the cable cover.
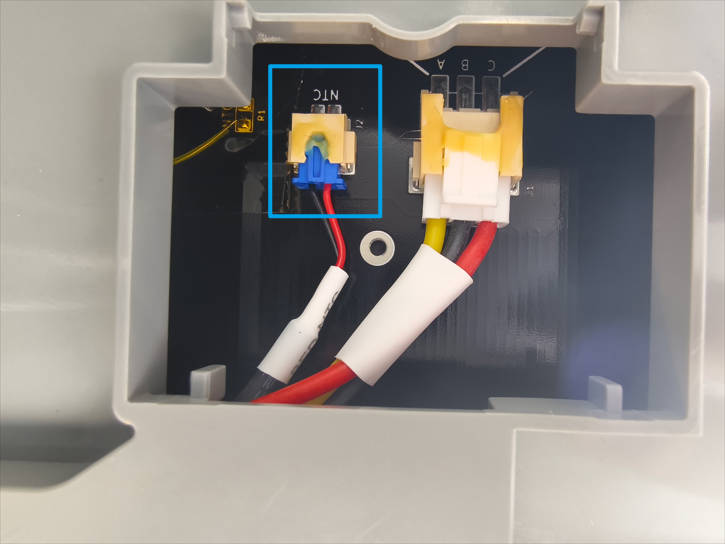
Unplug and replug the bed connection cable.
Unplug and replug the bed connection cable on the mainboard (remove all screws on the back cover of the printer).
Step 3: If Step 2 does not work, replace the bed heating assembly.(see 《Replacement of heater plate and bed bus (without removing bed support)》 for instructions.)
¶ 6. Printer stops mid-print, extruder stops, screen unresponsive.
Cause: Abnormal firmware
Solution:
Step 1: Restart the printer and try again.
Step 2: If the issue persists, please update to the latest firmware.
Step 3: If the issue persists, please copy logs to a USB flash drive and contact customer support.
¶ 7. Both the nozzle temperature and bed temperature displays as 0.
Cause:Extruder connection cable in poor contact or extruder board damaged, resulting in communication interruption between the mainboard and the extruder.
Solution:
Step 1: Restart the printer and observe if the same issue persists. If so, please proceed to Step 2.
Step 2: After shutting down the printer, follow the images below to open the rear cover of the extruder and check for poor contact or damage to the extruder connection cable. Try unplugging and replugging the extruder connection cable before restarting the printer.
Specific steps for checking the extruder connection cable are as follows:
Remove the front cover of the extruder.
Use an M2 Allen wrench to remove the four screws on the top of the extruder, and then remove the top cover.
Use an M2 Allen wrench to remove the two screws from the extruder board.
Check for poor contact at the extruder connection cable connector. Then unplug and replug it.
Step 3: If Step 2 does not work, please contact customer support to replace the extruder connection cable/extruder board/mainboard. (See the relevant videos in Maintenance for AD5X for instructions.)